Primeros pasos
Prerrequisitos
Antes de usar el AI Localization Automator, asegúrate de tener:
- Contenido localizable: Propiedades de texto marcadas como localizables en tu proyecto
- Objetivo de localización: Un objetivo de localización configurado con el texto fuente recopilado
- Idiomas de destino: Al menos una cultura no nativa añadida a tu objetivo de localización
- Acceso al proveedor de IA: Clave API o acceso a tu servicio de traducción por IA elegido
Si no estás familiarizado con hacer que el texto sea localizable en Unreal Engine, comienza con nuestra Guía de configuración de localización para aprender a crear y configurar contenido de texto localizable.
Accediendo al gestor de traducción por IA
El plugin se integra directamente con el Panel de localización de Unreal Engine:
- Abre el Panel de localización (Herramientas → Panel de localización)
- Selecciona tu objetivo de localización
- Busca el botón "AI Translate" en la barra de herramientas del objetivo
- Haz clic en el botón para abrir el gestor de traducción por IA
![]()
El botón AI Translate solo aparece para objetivos de localización no del motor que tengan texto fuente recopilado y culturas de destino configuradas.
Configuración inicial
Cuando abras por primera vez el gestor de traducción por IA, necesitarás configurar tu proveedor de traducción:
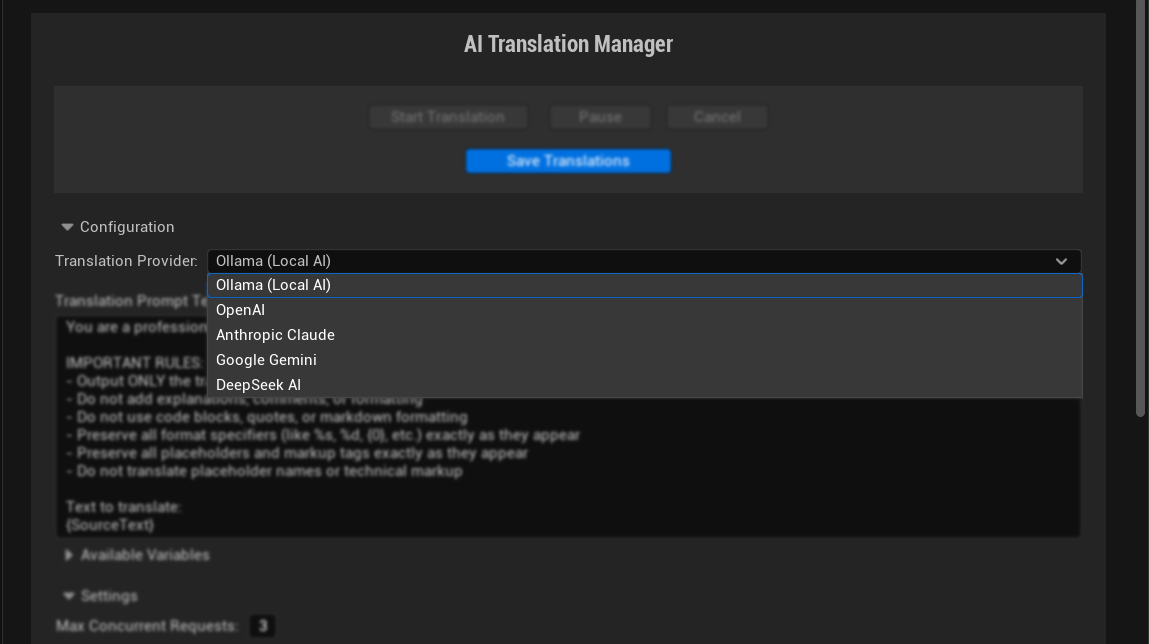
1. Selecciona el proveedor de traducción
Elige entre los proveedores de IA disponibles en el menú desplegable:
- Ollama: Ejecuta localmente para privacidad y sin costes de API, requiere configuración local
- OpenAI: Mejor calidad general, requiere clave API
- Anthropic Claude: Excelente para traducciones matizadas, requiere clave API
- DeepSeek: Opción rentable, requiere clave API
- Google Gemini: Buena calidad con precios competitivos, requiere clave API
2. Configura los ajustes del proveedor
Cada proveedor tiene diferentes requisitos y opciones de configuración. Aunque la interfaz proporciona sugerencias útiles al pasar el cursor sobre cada parámetro, para detalles completos sobre todos los ajustes disponibles y opciones de configuración para cada proveedor específico, consulta la guía Proveedores de traducción.
Proveedores en la nube (OpenAI, Claude, DeepSeek, Gemini) típicamente requieren como mínimo una Clave API para autenticación, junto con varias otras opciones de configuración como selección de modelo, ajustes de temperatura, límites de tokens y tiempos de espera de solicitud.
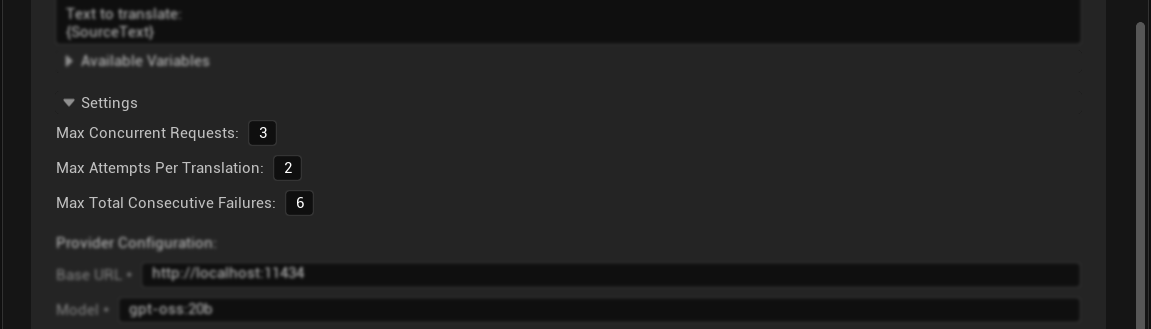
Proveedores locales (Ollama) requieren como mínimo una URL base y un Modelo a especificar, más parámetros adicionales para ajustar finamente el servicio local.
3. Personaliza los ajustes de traducción
Configurar el comportamiento del proceso de traducción:
- Máximo de Solicitudes Simultáneas: Número de traducciones simultáneas (se recomienda comenzar con 10, aunque algunos proveedores pueden requerir valores más bajos; por ejemplo, Ollama generalmente funciona mejor con un máximo de 4 solicitudes debido a limitaciones de procesamiento local)
- Máximo de Intentos por Traducción: Límite de reintentos para traducciones fallidas (se recomiendan 2)
- Máximo de Fallos Consecutivos: Umbral de parada para errores consecutivos (se recomiendan 6)
Tu Primera Traducción
Con la configuración completada, estás listo para traducir:
- Revisar Contenido: La tabla de traducción muestra todas las entradas de texto detectables
- Verificar Estado: Consulta qué traducciones están pendientes, completadas o fallidas
- Iniciar Traducción: Haz clic en "Iniciar Traducción" para comenzar el proceso
- Monitorear Progreso: Observa las actualizaciones de progreso en tiempo real y los mensajes de estado
- Guardar Resultados: Utiliza "Guardar Traducciones" para confirmar el trabajo completado en los archivos de almacenamiento
Completar el Proceso de Localización
Después de guardar sus traducciones, necesita completar el flujo de trabajo de localización de UE:
1. Volver al Panel de Localización
Cierre el Administrador de Traducción por IA y regrese al Panel de Localización.
2. Recopilar Texto y Verificar Resultados
Haga clic en el botón "Recopilar Texto" y espere a que el proceso se complete. Esto actualiza el sistema de localización con sus nuevas traducciones. Una vez que la recopilación se complete, verifique que las estadísticas de Recuento de Palabras muestren sus traducciones actualizadas - debería ver porcentajes de traducción aumentados para sus culturas objetivo.
3. Compilar Texto
Haz clic en el botón "Compilar Texto" para finalizar las traducciones. Esto crea los archivos binarios que tu juego utilizará realmente.
4. Empaquetar Idiomas para Distribución
Después de compilar el texto, para asegurar que el texto traducido aparezca en tu proyecto empaquetado:
- Abre Configuración del Proyecto (Editar → Configuración del Proyecto)
- Navega a la sección Empaquetado en la barra lateral izquierda
- Expande la categoría Avanzado en la configuración de Empaquetado
- Encuentra el campo "Idiomas a Empaquetar"
- Haz clic en el botón de opción "Mostrar Localizados" para mostrar solo los idiomas previamente localizados
- Selecciona los idiomas a empaquetar - puedes hacer clic en "Todos" en el lado derecho del cuadro de texto "Seleccionar" para seleccionar todos los idiomas localizados
- Empaqueta tu proyecto - los idiomas especificados ahora se incluirán y estarán disponibles como opciones de localización en tu juego
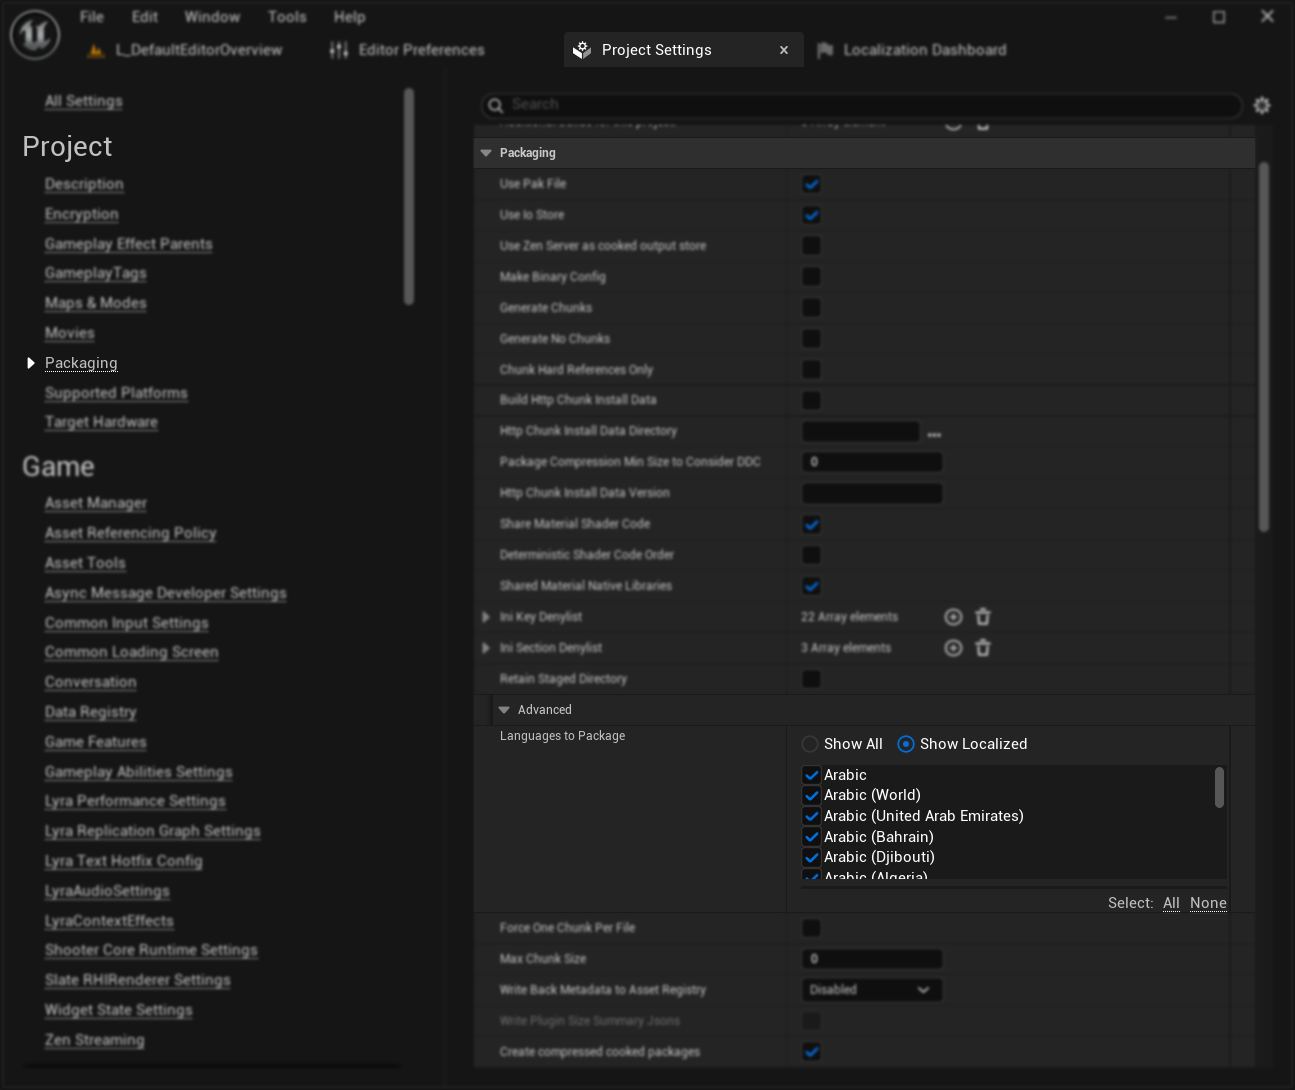
Este paso es esencial para que tus traducciones estén disponibles en el juego empaquetado final.
5. Prueba Tus Traducciones
Una vez que la compilación esté completa, puedes probar y previsualizar tus traducciones en el editor o en el juego. Para instrucciones detalladas sobre cómo probar la localización, consulta nuestra Guía de Pruebas de Localización.
Próximos Pasos
- Proveedores de Traducción: Conoce las fortalezas y configuración de cada proveedor
- Características Avanzadas: Explora presets, gestión de sesiones y menús contextuales
- Configuración de Localización: Aprende cómo hacer que el texto sea localizable en UE
Comienza con un subconjunto pequeño de texto (quizás 10-20 entradas) para probar tu configuración de proveedor y asegurar que las traducciones cumplan con tus expectativas de calidad antes de procesar lotes grandes.