로컬라이제이션 설정
이 가이드는 AI 로컬라이제이션 오토메이터가 텍스트를 발견하고 번역할 수 있도록 언리얼 엔진에서 텍스트를 지역화 가능하게 만드는 방법을 보여줍니다.
언리얼 엔진의 로컬라이제이션 파이프라인에 이미 익숙하고 FText 설정, 로컬라이제이션 타겟, 텍스트 수집 경험이 있다면, 이 페이지를 안전하게 건너뛰고 바로 시작하기로 이동할 수 있습니다.
이 페이지는 AI 로컬라이제이션 오토메이터를 포함한 모든 번역 도구를 사용하기 전에 필요한 기본적인 UE 로컬라이제이션 설정을 다룹니다.
언리얼 엔진의 로컬라이제이션 시스템이 완전히 처음이라면, 먼저 이 짧은 비디오 튜토리얼을 시청하는 것을 적극 권장합니다: Unreal Engine 5 Localization Tutorial.
비디오를 시청한 후에는 이 페이지에서 다루는 대부분의 주제가 이미 명확하고 이해할 수 있을 것이며, 아마도 이 페이지를 건너뛰고 바로 시작하기로 이동할 수 있을 것입니다.
아래 가이드는 일반적인 언리얼 엔진 로컬라이제이션 설정과 워크플로우를 다룹니다. 이러한 단계는 AI 기반 번역뿐만 아니라 UE의 모든 번역 프로젝트에 적용 가능합니다. 이는 기본적인 로컬라이제이션 개념과 설정 과정에 대한 참고 자료입니다.
지역화 가능한 텍스트 이해하기
AI 로컬라이제이션 오토메이터가 작동하려면 프로젝트에서 지역화 가능으로 표시된 FText 속성이 필요합니다. 플러그인은 UE의 로컬라이제이션 시스템을 통해 텍스트를 발견하므로, 텍스트가 먼저 적절히 구성되어야 합니다.
FText vs FString vs FName
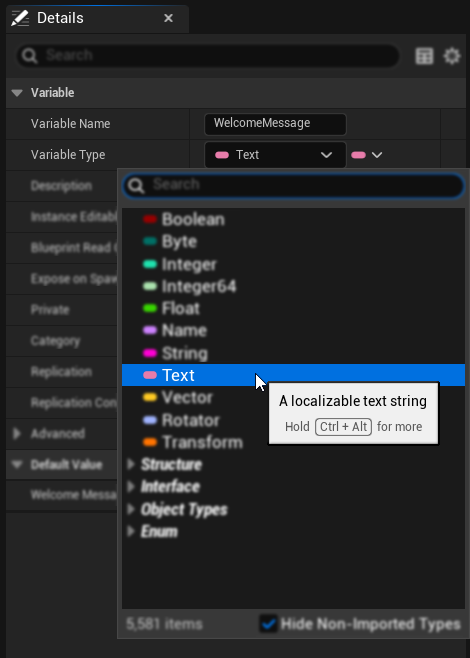
언리얼 엔진에서 FText (Blueprints에서는 Text)만 지역화할 수 있습니다:
- ✅ FText: 지역화 가능, 풍부한 서식 지원, 사용자 대상 텍스트에 사용
- ❌ FString: 지역화 불가능, 내부 데이터 및 파일 경로에 사용
- ❌ FName: 지역화 불가능, 식별자 및 키에 사용

Blueprints에서 텍스트를 지역화 가능하게 만들기
1. FText 변수 생성하기
Blueprint 클래스에서:
- FText 변수 추가하기
- Blueprint 클래스를 엽니다
- Text (FText) 타입의 새 변수를 추가합니다
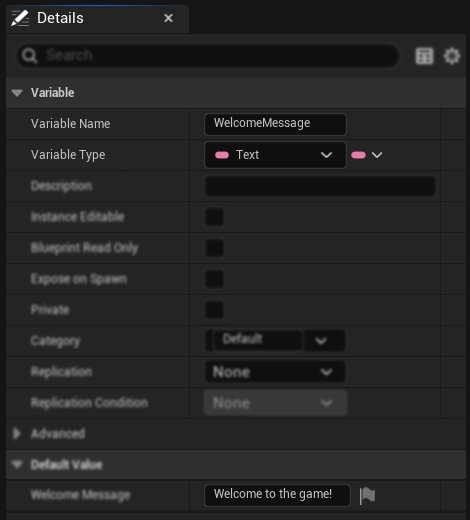
- 기본값 설정하기
- 변수 세부 정보에서 기본 텍스트 값을 설정합니다
- 이 값은 번역을 위한 소스 텍스트가 됩니다
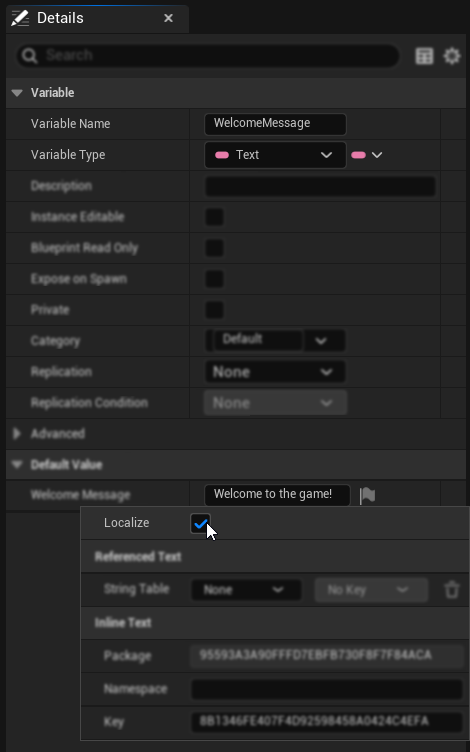
- 로컬라이제이션 활성화하기
- 텍스트 콘텐츠 오른쪽에 있는 깃발 아이콘을 클릭합니다
- 열리는 로컬라이제이션 창에서 "Localize" 체크박스를 선택합니다 - 이것이 중요합니다!
- 선택적으로 조직을 위해 사용자 정의 Key와 Namespace를 설정할 수 있습니다
2. FText가 사용되는 곳
로컬라이즈 가능한 FText 변수가 있으면, 이를 Unreal Engine 생태계 전반에서 사용할 수 있습니다. 여기에는 UMG 위젯, HUD 클래스, UI 메시지를 위한 GameMode/GameState, 상호작용 프롬프트를 위한 Actor 컴포넌트, 대화 시스템, 입력 액션 이름, 업적/트로피 설명, 저장 게임 표시 텍스트, 콘솔 명령 도움말 텍스트, 에디터 도구, 그리고 사용자에게 콘텐츠를 표시하는 모든 커스텀 Blueprint 또는 C++ 시스템이 포함됩니다.
C++에서 텍스트를 로컬라이즈 가능하게 만들기
1. LOCTEXT 매크로 사용하기
C++에서 정적 텍스트의 경우:
// At the top of your file
#define LOCTEXT_NAMESPACE "MyGameUI"

// Create localizable text
FText WelcomeText = LOCTEXT("WelcomeMessage", "Welcome to the game!");
FText ButtonText = LOCTEXT("StartButton", "Start Game");

// At the end of your file
#undef LOCTEXT_NAMESPACE
2. 특정 네임스페이스에 NSLOCTEXT 사용하기
// For text with custom namespace/key
FText ScoreText = NSLOCTEXT("GameUI", "ScoreLabel", "Score: {0}");
FText HealthText = NSLOCTEXT("GameUI", "HealthDisplay", "Health");
3. 클래스 내 FText 속성
UCLASS()
class MYGAME_API UMyUserWidget : public UUserWidget
{
    GENERATED_BODY()

public:
    // Localizable text property
    UPROPERTY(EditAnywhere, BlueprintReadWrite, Category = "Localization")
    FText DisplayText;

    // Function returning localizable text
    UFUNCTION(BlueprintCallable)
    FText GetWelcomeMessage() const
    {
        return LOCTEXT("Welcome", "Welcome, player!");
    }
};
로컬라이제이션 대상 설정하기
1. 로컬라이제이션 대상 생성하기
- 로컬라이제이션 대시보드 열기 (Tools → Localization Dashboard)
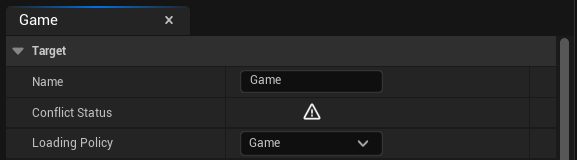
- 기본적으로 번역할 텍스트를 가져올 수 있는 Game 대상이 이미 존재해야 합니다
- Game 대상이 없는 경우, **"Add New Target"**을 클릭하고 이름으로 **"Game"**을 입력한 후 Loading Policy로 Game을 선택하세요
2. 수집 설정 구성하기
- 대시보드에서 대상을 선택하세요
- Game 패널의 "Gather Text" 섹션으로 이동하세요
Blueprint 콘텐츠의 경우:
- **"Gather from Packages"**를 켜고 확장하세요
- **"Include Path Wildcards"**에서 지역화 가능한 텍스트가 있는 에셋이 위치한 디렉토리를 선택하세요
C++ 콘텐츠의 경우:
- **"Gather from Text Files"**를 켜고 확장하세요
- **"Search Directories"**에서 소스 지역화 가능 텍스트가 있는 C++ 코드의 디렉토리를 제공하세요
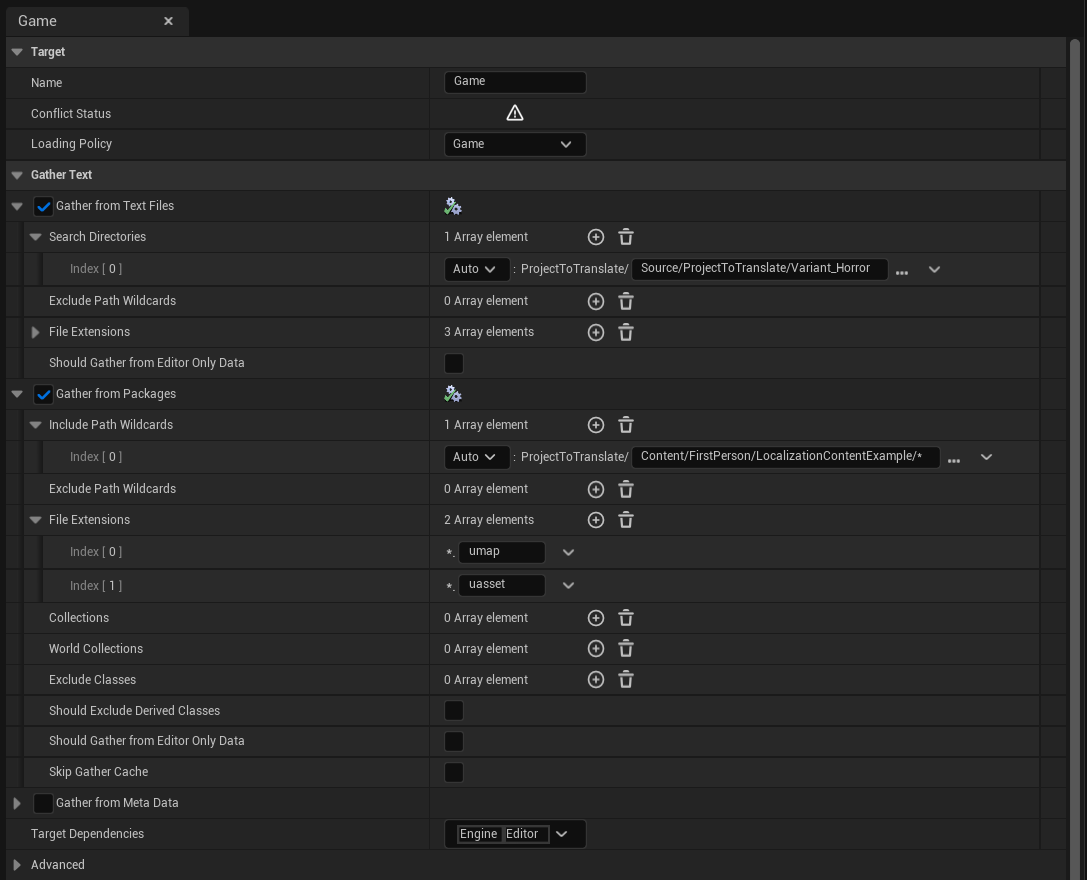
Exclude Path Wildcards, File Extensions 및 시스템이 지역화 가능한 텍스트를 검색하는 방식을 미세 조정할 수 있는 다른 옵션과 같은 많은 추가 매개변수를 사용할 수 있습니다.
3. 대상 언어 추가하기
- 로컬라이제이션 대시보드에서 대상을 선택한 상태로
- "Add New Language" 버튼을 클릭하세요
- 드롭다운에서 단일 언어를 선택하세요 (예: Spanish, French, German)
- 번역하려는 각 대상 언어에 대해 이 과정을 반복하세요
- 언어 목록 왼쪽의 라디오 버튼을 사용하여 원본 언어가 기본 언어로 표시되어 있는지 확인하세요 (English가 기본적으로 선택됨)
4. 텍스트 수집
- 대상에서 "텍스트 수집" 버튼을 클릭하세요
- 수집 과정이 완료될 때까지 기다리세요
- 과정이 끝나면 "확인" 버튼을 클릭하세요
- 단어 수 열에 텍스트 항목이 나타나는지 확인하세요
5. 현지화 내용 편집
텍스트가 수집되면, 이제 수동으로 현지화 내용을 편집하고 추가할 수 있습니다:
- 각 대상 언어의 Actions 열에 있는 Edit 버튼 (첫 번째 버튼)을 클릭합니다.
- 이렇게 하면 언어별로 단어와 문구를 수동으로 번역할 수 있는 현지화 편집기가 열립니다.
- 테스트 목적으로, 시스템이 작동하는지 확인하기 위해 자신만의 테스트 현지화 내용을 수동으로 추가할 수 있습니다.
AI Localization Automator 플러그인은 AI 제공업체를 사용하여 이 번역 프로세스를 자동으로 처리합니다. 자동 AI 번역에 대한 자세한 내용은 시작하기를 참조하세요.
6. 텍스트 컴파일
현지화 내용을 추가한 후 (수동으로 또는 첫 번째 번역하기에서 설명하는 AI Localization Automator를 통해):
- 현지화 대상에서 "Compile Text" 버튼을 클릭합니다.
- 컴파일 프로세스가 완료될 때까지 기다립니다 - 텍스트 수집 작업과 유사합니다.
- 컴파일이 완료되면, 번역된 텍스트가 프로젝트에서 사용 가능해지고 표시되어야 합니다.
- 이제 아래에 설명된 방법을 사용하여 현지화 내용을 테스트할 수 있습니다.
현지화 테스트
현지화 설정을 테스트하는 다양한 방법이 있습니다. 가장 일반적으로 사용되는 방법은 다음과 같습니다:
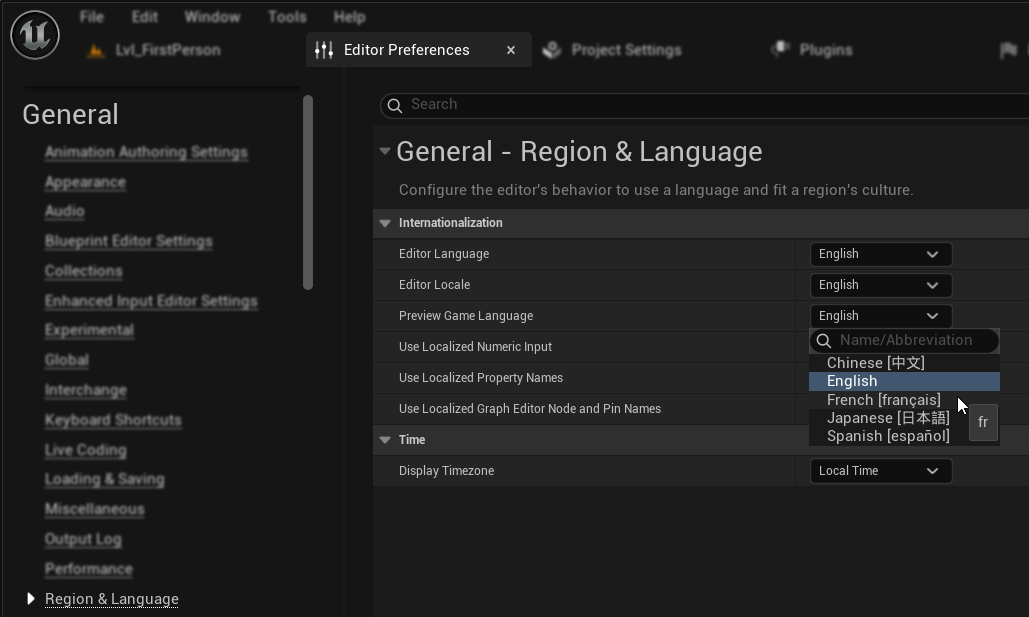
방법 1: 에디터 환경설정
- 에디터 환경설정 → 지역 및 언어로 이동합니다.
- "게임 언어 미리보기" 속성에서 미리 볼 언어를 선택합니다.
- 참고: 언어 목록이 누락된 경우, 이는 에디터를 재시작하면 해결되는 일반적인 UE 버그일 수 있습니다.
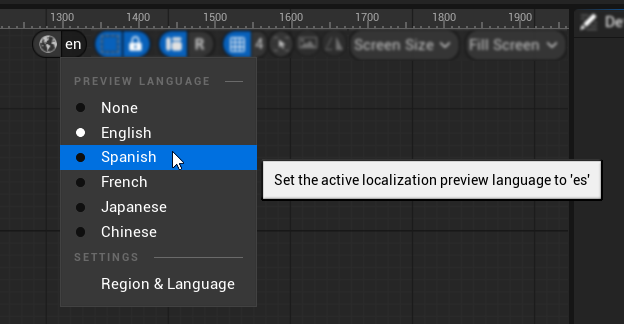
방법 2: UMG 미리보기
- UMG 에디터에서 UI 위젯의 번역을 미리보고 싶을 때 사용합니다.
- 미리보기 위젯의 오른쪽 상단 섹션에 현지화 미리보기를 위한 언어 선택 옵션이 있습니다.
AI 번역 준비 완료
다음 항목들이 준비되면:
- ✅ 프로젝트 내 현지화 가능한 FText 콘텐츠
- ✅ "Game" 이름으로 올바르게 구성된 현지화 대상
- ✅ 올바른 수집 설정을 사용하여 소스 텍스트를 성공적으로 수집함
- ✅ 번역을 위한 대상 언어 추가
- ✅ 테스트를 통해 설정을 확인함
이제 AI Localization Automator를 사용할 준비가 되었습니다! AI 제공자를 구성하고 번역을 시작하려면 시작하기로 이동하세요.