픽셀 스트리밍 오디오 캡처
픽셀 스트리밍은 Unreal Engine용 플러그인으로, 렌더링된 프레임을 스트리밍하고 WebRTC를 통해 입력/출력을 동기화합니다. 애플리케이션은 서버 측에서 실행되는 반면, 클라이언트 측은 렌더링과 사용자 상호작용을 처리합니다. 픽셀 스트리밍 및 설정에 대한 자세한 내용은 픽셀 스트리밍 문서를 참조하세요.
픽셀 스트리밍 vs 픽셀 스트리밍 2
이 플러그인은 Unreal Engine에서 사용 가능한 두 가지 픽셀 스트리밍 버전을 모두 지원합니다:
- 픽셀 스트리밍 - 원본 플러그인으로, UE 5.2부터 사용 가능하며 현재 엔진 버전에서도 활발히 사용됨
- 픽셀 스트리밍 2 - UE 5.5에서 도입된 차세대 구현체로, 개선된 내부 아키텍처를 가짐. 픽셀 스트리밍 2에 대해 자세히 알아보기
두 버전 모두 최신 Unreal Engine 릴리스에서 완전히 지원되며 사용 가능합니다. 프로젝트의 픽셀 스트리밍 설정과 일치하는 버전을 선택하세요.
두 버전의 API는 동일하며, 유일한 차이점은 픽셀 스트리밍 2 클래스와 함수 이름에 "2"가 포함된다는 점입니다(예: UPixelStreamingCapturableSoundWave vs UPixelStreaming2CapturableSoundWave).
호환성
이 솔루션은 다음 환경에서 작동합니다:
- 공식 픽셀 스트리밍 인프라 (Epic Games 참조 구현)
- 타사 픽셀 스트리밍 제공업체 포함:
- Vagon.io
- Arcane Mirage
- Eagle 3D Streaming
- 기타 WebRTC 기반 스트리밍 솔루션
- 운영 체제: Windows 및 Linux 서버
구현은 이러한 환경에서 테스트되었으며, 사용된 픽셀 스트리밍 호스팅 솔루션에 관계없이 올바르게 작동합니다.
확장 플러그인 설치
이 기능은 Runtime Audio Importer 플러그인의 확장으로 제공됩니다. 사용하려면 다음이 필요합니다:
- Runtime Audio Importer 플러그인이 프로젝트에 이미 설치되어 있는지 확인
- 픽셀 스트리밍 버전에 맞는 확장 플러그인 다운로드:
- 다운로드한 아카이브에서 폴더를 추출하여 프로젝트의
Plugins폴더에 넣기(폴더가 없으면 생성) - 프로젝트 재빌드(이 확장 기능은 C++ 프로젝트가 필요함)
- 이러한 확장 기능은 소스 코드로 제공되며 사용하려면 C++ 프로젝트가 필요함
- 픽셀 스트리밍 확장: UE 5.2 이상에서 지원됨
- 픽셀 스트리밍 2 확장: UE 5.5 이상에서 지원됨
- 플러그인을 수동으로 빌드하는 방법에 대한 자세한 내용은 플러그인 빌드 튜토리얼 참조
개요
픽셀 스트리밍 캡처 가능 사운드 웨이브는 표준 캡처 가능 사운드 웨이브를 확장하여 픽셀 스트리밍 클라이언트의 마이크에서 직접 오디오를 캡처할 수 있도록 합니다. 이 기능을 통해 다음을 수행할 수 있습니다:
- 픽셀 스트리밍을 통해 연결된 브라우저에서 오디오 캡처
- 특정 플레이어/피어의 오디오 처리
- 원격 사용자의 음성 채팅, 음성 명령 또는 오디오 녹음 구현
기본 사용법
픽셀 스트리밍 캡처 가능 사운드 웨이브 생성
먼저, 픽셀 스트리밍 캡처 가능 사운드 웨이브 객체를 생성해야 합니다:
- Pixel Streaming
- Pixel Streaming 2
- Blueprint
- C++
![]()
PixelStreamingSoundWave = UPixelStreamingCapturableSoundWave::CreatePixelStreamingCapturableSoundWave();
- Blueprint
- C++
Create Pixel Streaming 2 Capturable Sound Wave 노드를 사용하세요 (Pixel Streaming과 동일하지만 이름에 "2"가 포함됨)
PixelStreamingSoundWave = UPixelStreaming2CapturableSoundWave::CreatePixelStreaming2CapturableSoundWave();
Pixel Streaming Capturable Sound Wave가 조기에 파괴되는 것을 방지하려면 강한 참조로 취급해야 합니다 (예: Blueprints에서 별도의 변수에 할당하거나 C++에서 UPROPERTY()를 사용).
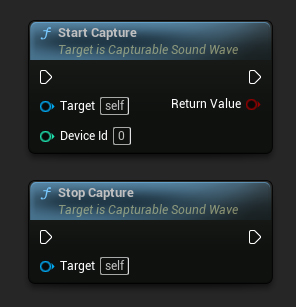
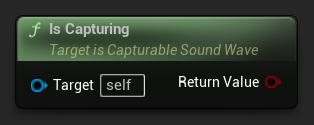
캡처 시작 및 중지
간단한 함수 호출로 오디오 캡처를 시작하고 중지할 수 있습니다:
- Pixel Streaming
- Pixel Streaming 2
- Blueprint
- C++
// Assuming PixelStreamingSoundWave is a reference to a UPixelStreamingCapturableSoundWave object

// Start capturing audio (the device ID parameter is ignored for Pixel Streaming)
PixelStreamingSoundWave->StartCapture(0);

// Stop capturing audio
PixelStreamingSoundWave->StopCapture();
- Blueprint
- C++
Pixel Streaming 2 캡처 가능 사운드 웨이브에 동일한 Start Capture 및 Stop Capture 노드를 사용하세요.
// Assuming PixelStreamingSoundWave is a reference to a UPixelStreaming2CapturableSoundWave object

// Start capturing audio (the device ID parameter is ignored for Pixel Streaming 2)
PixelStreamingSoundWave->StartCapture(0);

// Stop capturing audio
PixelStreamingSoundWave->StopCapture();
Pixel Streaming Capturable Sound Waves의 경우 StartCapture의 DeviceId 매개변수는 무시됩니다. 캡처 소스는 자동으로 또는 설정한 플레이어 정보에 의해 결정됩니다.
캡처 상태 확인
사운드 웨이브가 현재 오디오를 캡처 중인지 확인할 수 있습니다:
- Pixel Streaming
- Pixel Streaming 2
- Blueprint
- C++
// Assuming PixelStreamingSoundWave is a reference to a UPixelStreamingCapturableSoundWave object
bool bIsCapturing = PixelStreamingSoundWave->IsCapturing();
- Blueprint
- C++
Pixel Streaming 2 캡처 가능 사운드 웨이브에 동일한 Is Capturing 노드를 사용하세요.
// Assuming PixelStreamingSoundWave is a reference to a UPixelStreaming2CapturableSoundWave object
bool bIsCapturing = PixelStreamingSoundWave->IsCapturing();
완전한 예제
다음은 Pixel Streaming 오디오 캡처를 설정하는 방법에 대한 완전한 예제입니다:
- Pixel Streaming
- Pixel Streaming 2
- Blueprint
- C++
![]()
다음은 Pixel Streaming 클라이언트로부터 오디오 데이터를 캡처하기 위한 기본 코드 예제입니다.
이 예제는 EXAMPLEMODULE 모듈 내 UPixelStreamingAudioExample 클래스에 위치한 CapturePixelStreamingAudioExample 함수를 사용합니다.
예제를 성공적으로 실행하려면 .Build.cs 파일과 프로젝트의 .uproject 파일 모두에 RuntimeAudioImporter 및 PixelStreaming 모듈을 PublicDependencyModuleNames 또는 PrivateDependencyModuleNames에 추가해야 합니다.
#pragma once

#include "CoreMinimal.h"
#include "UObject/Object.h"
#include "PixelStreamingAudioExample.generated.h"

UCLASS(BlueprintType)
class EXAMPLEMODULE_API UPixelStreamingAudioExample : public UObject
{
	GENERATED_BODY()

public:
	UFUNCTION(BlueprintCallable)
	void CapturePixelStreamingAudioExample();

private:
	// Keep a strong reference to prevent garbage collection
	UPROPERTY()
	class UPixelStreamingCapturableSoundWave* PixelStreamingSoundWave;
};
#include "PixelStreamingAudioExample.h"
#include "Sound/PixelStreamingCapturableSoundWave.h"
#include "Kismet/GameplayStatics.h"

void UPixelStreamingAudioExample::CapturePixelStreamingAudioExample()
{
	// Create a Pixel Streaming Capturable Sound Wave
	PixelStreamingSoundWave = UPixelStreamingCapturableSoundWave::CreatePixelStreamingCapturableSoundWave();

	// Start capturing audio
	PixelStreamingSoundWave->StartCapture(0);

	// Play the sound wave to hear the captured audio
	UGameplayStatics::PlaySound2D(GetWorld(), PixelStreamingSoundWave);

	// Set up a timer to stop capture after 30 seconds (just for demonstration)
	FTimerHandle TimerHandle;
	GetWorld()->GetTimerManager().SetTimer(TimerHandle, [this]()
	{
		PixelStreamingSoundWave->StopCapture();
	}, 30.0f, false);
}
- Blueprint
- C++
Blueprint 설정은 Pixel Streaming과 동일하지만, Create Pixel Streaming 2 Capturable Sound Wave 노드를 대신 사용하세요.
Pixel Streaming 2 클라이언트로부터 오디오 데이터를 캡처하기 위한 기본 코드 예제입니다.
이 예제는 EXAMPLEMODULE 모듈 내 UPixelStreaming2AudioExample 클래스에 있는 CapturePixelStreaming2AudioExample 함수를 사용합니다.
예제를 성공적으로 실행하려면 .Build.cs 파일과 프로젝트의 .uproject 파일 모두에 RuntimeAudioImporter 및 PixelStreaming2 모듈을 PublicDependencyModuleNames 또는 PrivateDependencyModuleNames에 추가해야 합니다.
#pragma once

#include "CoreMinimal.h"
#include "UObject/Object.h"
#include "PixelStreaming2AudioExample.generated.h"

UCLASS(BlueprintType)
class EXAMPLEMODULE_API UPixelStreaming2AudioExample : public UObject
{
	GENERATED_BODY()

public:
	UFUNCTION(BlueprintCallable)
	void CapturePixelStreaming2AudioExample();

private:
	// Keep a strong reference to prevent garbage collection
	UPROPERTY()
	class UPixelStreaming2CapturableSoundWave* PixelStreamingSoundWave;
};
#include "PixelStreaming2AudioExample.h"
#include "Sound/PixelStreaming2CapturableSoundWave.h"
#include "Kismet/GameplayStatics.h"

void UPixelStreaming2AudioExample::CapturePixelStreaming2AudioExample()
{
	// Create a Pixel Streaming 2 Capturable Sound Wave
	PixelStreamingSoundWave = UPixelStreaming2CapturableSoundWave::CreatePixelStreaming2CapturableSoundWave();

	// Start capturing audio
	PixelStreamingSoundWave->StartCapture(0);

	// Play the sound wave to hear the captured audio
	UGameplayStatics::PlaySound2D(GetWorld(), PixelStreamingSoundWave);

	// Set up a timer to stop capture after 30 seconds (just for demonstration)
	FTimerHandle TimerHandle;
	GetWorld()->GetTimerManager().SetTimer(TimerHandle, [this]()
	{
		PixelStreamingSoundWave->StopCapture();
	}, 30.0f, false);
}
다중 Pixel Streaming 플레이어 작업
여러 개의 Pixel Streaming 클라이언트가 동시에 연결된 시나리오에서는 특정 플레이어의 오디오를 캡처해야 할 수 있습니다. 다음 기능들이 이를 관리하는 데 도움이 됩니다.
사용 가능한 Pixel Streaming 플레이어 가져오기
어떤 Pixel Streaming 플레이어가 연결되어 있는지 식별하려면:
- Pixel Streaming
- Pixel Streaming 2
- Blueprint
- C++
![]()
UPixelStreamingCapturableSoundWave::GetAvailablePixelStreamingPlayers(FOnGetAvailablePixelStreamingPlayersResultNative::CreateWeakLambda(this, [](const TArray<FPixelStreamingPlayerInfo_RAI>& AvailablePlayers)
{
    // Handle the list of available players
    for (const FPixelStreamingPlayerInfo_RAI& PlayerInfo : AvailablePlayers)
    {
        UE_LOG(LogTemp, Log, TEXT("Available player: %s on streamer: %s"), *PlayerInfo.PlayerId, *PlayerInfo.StreamerId);
    }
}));
- Blueprint
- C++
Get Available Pixel Streaming 2 Players 노드를 사용하세요
UPixelStreaming2CapturableSoundWave::GetAvailablePixelStreaming2Players(FOnGetAvailablePixelStreaming2PlayersResultNative::CreateWeakLambda(this, [](const TArray<FPixelStreaming2PlayerInfo_RAI>& AvailablePlayers)
{
    // Handle the list of available players
    for (const FPixelStreaming2PlayerInfo_RAI& PlayerInfo : AvailablePlayers)
    {
        UE_LOG(LogTemp, Log, TEXT("Available player: %s on streamer: %s"), *PlayerInfo.PlayerId, *PlayerInfo.StreamerId);
    }
}));
캡처할 플레이어 설정하기
특정 플레이어로부터 캡처해야 할 때:
- Pixel Streaming
- Pixel Streaming 2
- Blueprint
- C++
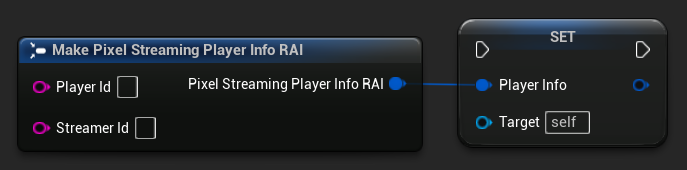
// Assuming PixelStreamingSoundWave is a reference to a UPixelStreamingCapturableSoundWave object
// and PlayerInfo is a FPixelStreamingPlayerInfo_RAI object from GetAvailablePixelStreamingPlayers

PixelStreamingSoundWave->PlayerInfo = PlayerInfo;
- Blueprint
- C++
Set Player To Capture From 노드를 사용하여 Pixel Streaming 2 Capturable Sound Wave를 지정하세요.
// Assuming PixelStreamingSoundWave is a reference to a UPixelStreaming2CapturableSoundWave object
// and PlayerInfo is a FPixelStreaming2PlayerInfo_RAI object from GetAvailablePixelStreaming2Players

PixelStreamingSoundWave->PlayerInfo = PlayerInfo;
플레이어 ID를 비워두면, 사운드 웨이브는 연결 가능한 첫 번째 플레이어를 자동으로 수신합니다. 이것은 기본 동작이며 단일 플레이어 시나리오에서 잘 작동합니다.
일반적인 사용 사례
음성 채팅 구현
Pixel Streaming Capturable Sound Waves를 사용하여 원격 사용자와 로컬 플레이어 간의 음성 채팅을 구현할 수 있습니다:
- 연결된 각 플레이어에 대해 Pixel Streaming Capturable Sound Wave 생성
- 현재 누가 말하고 있는지 관리하는 시스템 설정
- 사용자가 말할 때 감지하기 위해 음성 활동 감지 시스템 사용
- 필요한 경우 Unreal Engine의 오디오 시스템을 사용하여 오디오 공간화
음성 인식을 통한 음성 명령
이 기능을 Runtime Speech Recognizer 플러그인과 결합하여 원격 사용자를 위한 음성 명령 인식을 구현할 수 있습니다:
- Pixel Streaming Capturable Sound Wave를 사용하여 Pixel Streaming 클라이언트로부터 오디오 캡처
- 캡처된 오디오를 Runtime Speech Recognizer에 직접 공급
- 게임 로직에서 인식된 텍스트 처리
Runtime Speech Recognizer 예제에서 표준 Capturable Sound Wave를 Pixel Streaming Capturable Sound Wave(또는 Pixel Streaming 2 Capturable Sound Wave)로 간단히 교체하면 Pixel Streaming 오디오 입력과 원활하게 작동합니다.
원격 사용자 오디오 녹음
나중에 재생하기 위해 원격 사용자의 오디오를 녹음할 수 있습니다:
- Pixel Streaming Capturable Sound Wave를 사용하여 오디오 캡처
- 오디오 내보내기를 사용하여 캡처된 오디오를 파일로 내보내기
- 나중에 사용하거나 분석하기 위해 파일 저장