Настройка локализации
Это руководство показывает, как сделать текст локализуемым в Unreal Engine, чтобы AI Localization Automator мог его обнаружить и перевести.
Если вы уже знакомы с конвейером локализации Unreal Engine и имеете опыт настройки FText, целей локализации и сбора текста, вы можете смело пропустить эту страницу и перейти непосредственно к Началу работы.
На этой странице рассматривается базовая настройка локализации в UE, которая требуется перед использованием любых инструментов перевода, включая AI Localization Automator.
Если вы совершенно не знакомы с системой локализации Unreal Engine, мы настоятельно рекомендуем сначала посмотреть это короткое видео-руководство: Unreal Engine 5 Localization Tutorial.
После просмотра видео большинство тем, затронутых на этой странице, уже будут понятны, и вы, скорее всего, сможете пропустить эту страницу и перейти непосредственно к Началу работы.
Руководство ниже охватывает общую настройку и рабочий процесс локализации в Unreal Engine — эти шаги применимы к любому проекту перевода в UE, а не только к переводу на основе ИИ. Это справочник по фундаментальным концепциям локализации и процессу настройки.
Понимание локализуемого текста
Для работы AI Localization Automator вам нужны свойства FText, помеченные как локализуемые в вашем проекте. Плагин обнаруживает текст через систему локализации UE, поэтому текст сначала должен быть правильно настроен.
FText vs FString vs FName
Только FText (Text в Blueprints) можно локализовать в Unreal Engine:
- ✅ FText: Локализуем, поддерживает богатое форматирование, используется для текста, видимого пользователю
- ❌ FString: Не локализуем, используется для внутренних данных и путей к файлам
- ❌ FName: Не локализуем, используется для идентификаторов и ключей

Создание локализуемого текста в Blueprints
1. Создание переменных FText
В ваших классах Blueprint:
- Добавьте переменную FText
- Откройте ваш класс Blueprint
- Добавьте новую переменную типа Text (FText)
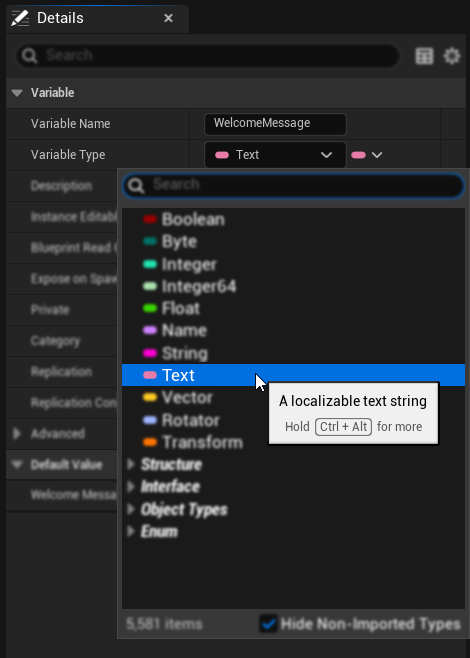
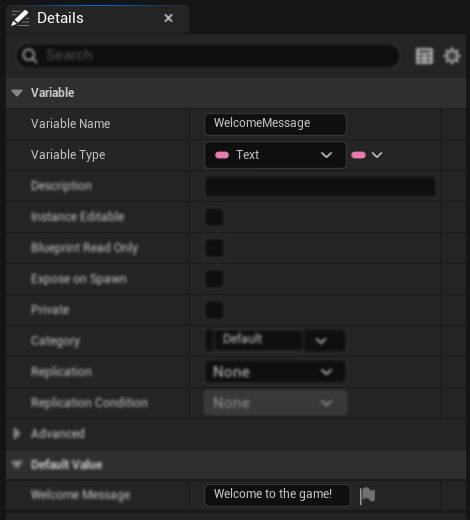
- Установите значение по умолчанию
- В деталях переменной установите ваше значение текста по умолчанию
- Это станет вашим исходным текстом для перевода
- Включите локализацию
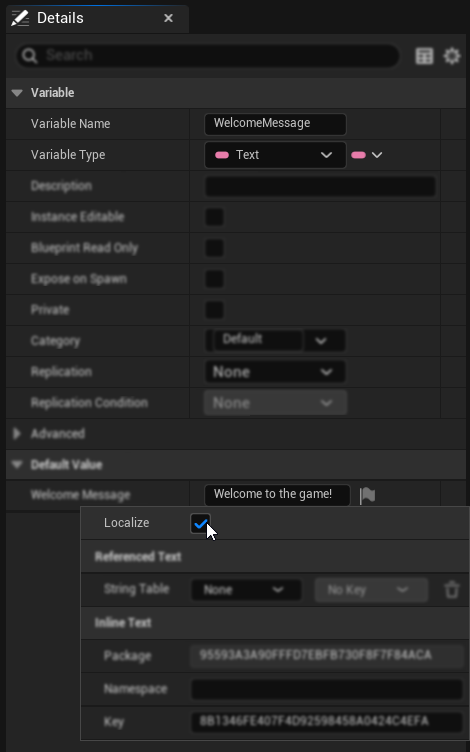
- Нажмите на иконку флага, расположенную справа от вашего текстового содержимого
- В открывшемся окне локализации установите флажок "Localize" — это критически важно!
- При желании установите пользовательский Key и Namespace для организации
2. Где используется FText
После того как у вас есть локализуемые переменные FText, их можно использовать по всей экосистеме Unreal Engine, включая: UMG виджеты, классы HUD, GameMode/GameState для UI сообщений, компоненты Actor для подсказок взаимодействия, системы диалогов, названия действий ввода, описания достижений/трофеев, отображаемый текст сохранений, справочный текст консольных команд, инструменты редактора и любые пользовательские системы Blueprint или C++, которые отображают контент для пользователя.
Создание локализуемого текста в C++
1. Использование макросов LOCTEXT
Для статического текста в C++:
// At the top of your file
#define LOCTEXT_NAMESPACE "MyGameUI"

// Create localizable text
FText WelcomeText = LOCTEXT("WelcomeMessage", "Welcome to the game!");
FText ButtonText = LOCTEXT("StartButton", "Start Game");

// At the end of your file
#undef LOCTEXT_NAMESPACE
2. Использование NSLOCTEXT для определенных пространств имен
// For text with custom namespace/key
FText ScoreText = NSLOCTEXT("GameUI", "ScoreLabel", "Score: {0}");
FText HealthText = NSLOCTEXT("GameUI", "HealthDisplay", "Health");
3. Свойства FText в классах
UCLASS()
class MYGAME_API UMyUserWidget : public UUserWidget
{
    GENERATED_BODY()

public:
    // Localizable text property
    UPROPERTY(EditAnywhere, BlueprintReadWrite, Category = "Localization")
    FText DisplayText;

    // Function returning localizable text
    UFUNCTION(BlueprintCallable)
    FText GetWelcomeMessage() const
    {
        return LOCTEXT("Welcome", "Welcome, player!");
    }
};
Настройка цели локализации
1. Создание цели локализации
- Откройте Панель управления локализацией (Инструменты → Панель управления локализацией)
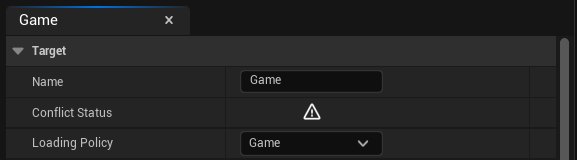
- По умолчанию уже должна быть доступна цель Game для перевода текста
- Если цели Game нет, нажмите "Добавить новую цель", введите "Game" в качестве имени и выберите Game в качестве Политики загрузки
2. Настройка параметров сбора
- Выберите вашу цель на панели управления
- Перейдите в раздел "Собрать текст" на панели Game
Для контента Blueprint:
- Включите "Собирать из пакетов" и разверните его
- В "Шаблоны путей включения" выберите директорию, где находятся ваши ассеты с локализуемым текстом
Для контента C++:
- Включите "Собирать из текстовых файлов" и разверните его
- В "Директории поиска" укажите директорию вашего кода C++, где находится исходный локализуемый текст

Доступно множество дополнительных параметров, таких как Шаблоны путей исключения, Расширения файлов и другие опции, которые позволяют точно настроить, как система ищет локализуемый текст.
3. Добавление целевых языков
- В Панели управления локализацией, с выбранной целью
- Нажмите кнопку "Добавить новый язык"
- Выберите один язык из выпадающего списка (например, испанский, французский, немецкий)
- Повторите этот процесс для каждого целевого языка, на который хотите перевести
- Убедитесь, что ваш родной язык помечен как исходный с помощью радиокнопки слева от списка языков (по умолчанию выбран английский)
4. Собрать текст
- Нажмите кнопку "Gather Text" в вашей цели
- Дождитесь завершения процесса сбора
- Нажмите кнопку "OK" после завершения процесса
- Убедитесь, что записи текста появились в колонке Word Count
5. Редактирование локализаций
После того как текст собран, вы можете вручную редактировать и добавлять локализации:
- Нажмите кнопку Edit (первая кнопка) в столбце Actions для каждого целевого языка
- Это откроет редактор локализаций, где вы можете вручную переводить слова и фразы для каждого языка
- Для тестирования вы можете вручную добавить свои собственные тестовые локализации, чтобы убедиться, что система работает
Плагин AI Localization Automator автоматически обработает этот процесс перевода с использованием AI-провайдеров. Подробную информацию об автоматическом AI переводе см. в разделе Начало работы.
6. Компиляция текста
После добавления локализаций (вручную или через AI Localization Automator, как объяснено в разделе Ваш первый перевод):
- Нажмите кнопку "Compile Text" в вашей цели локализации
- Дождитесь завершения процесса компиляции — аналогично операции Gather Text
- После завершения компиляции переведенный текст должен стать доступным и видимым в вашем проекте
- Теперь вы можете протестировать ваши локализации, используя методы, описанные ниже
Тестирование локализации
Существуют различные способы тестирования вашей настройки локализации. Вот наиболее часто используемые методы:
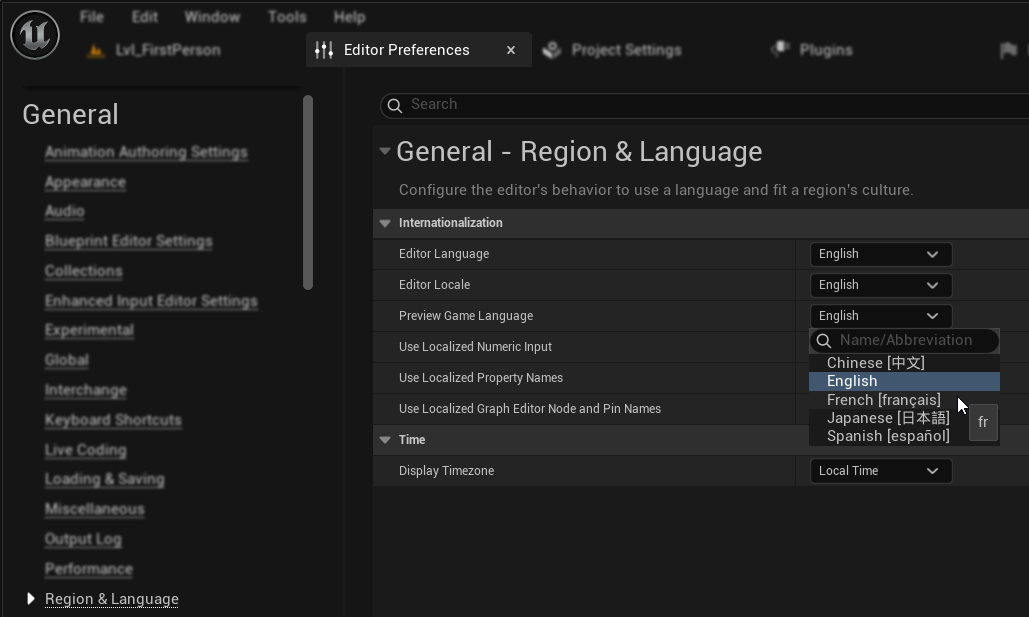
Метод 1: Настройки редактора
- Перейдите в Настройки редактора → Регион и язык
- В свойстве "Предварительный просмотр языка игры" выберите ваш язык для предпросмотра
- Примечание: Если список языков отсутствует, это может быть распространённой ошибкой UE, которая исправляется перезапуском редактора
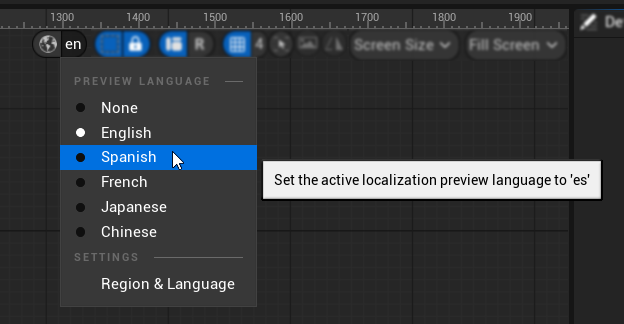
Метод 2: Предпросмотр UMG
- В редакторе UMG, когда вы хотите предварительно просмотреть переводы в ваших UI виджетах
- В правом верхнем разделе виджета предпросмотра есть опция для выбора языка предпросмотра локализаций
Готово к AI-переводу
Как только у вас есть:
- ✅ Локализуемый контент FText в вашем проекте
- ✅ Правильно настроенная цель локализации с именем "Game"
- ✅ Успешно собранный исходный текст с использованием правильных настроек сбора
- ✅ Добавленные целевые языки для перевода
- ✅ Проверенная настройка через тестирование
Вы готовы использовать AI Localization Automator! Перейдите к разделу Начало работы, чтобы настроить вашего AI-провайдера и начать перевод.