Eye Animation Helpers
In addition to lip sync, the Runtime MetaHuman Lip Sync plugin includes two optional helper utilities for animating MetaHuman eyes:
- Auto Blink: a helper that produces natural, randomized eye blinks on a MetaHuman
- Eyes Aim: an Animation Blueprint node that makes a MetaHuman's eyes look at a world-space location
These features are completely independent of lip sync and can be used on their own, together, or combined with the lip sync nodes. They're intended as lightweight, drop-in helpers for adding lifelike eye behavior without having to author it manually.
Feature Previews
Video Walkthrough
Full walkthrough of both helpers, including the legacy rig workaround.
If your facial animation pipeline already includes blinks and dynamic gaze, you can skip this page. These helpers exist for cases where you want lifelike eye behavior without authoring it yourself, for example, when your animation sequences don't include blinks, or when you need eyes to dynamically follow a moving target (something static animation sequences can't do). They can also be layered on top of existing facial animations to add missing pieces, such as blinks over a sequence that only animates the mouth.
Auto Blink
The Auto Blink helper produces randomized, natural-looking eye blinks by driving the CTRL_L_eye_blink and CTRL_R_eye_blink curves of the MetaHuman Face Control Rig.
How It Works
Each frame, you call Update MetaHuman Auto Blink from your Face Animation Blueprint's Event Graph and pass in the frame's delta time. The function:
- Tracks per-character state (next blink time, current open/closed phase, etc.) keyed by the calling
AnimInstance - Returns two float values in the 0..1 range, one for the left eye and one for the right eye, representing how closed each eye currently is
- You then store these values in Blueprint variables and feed them into the Control Rig node in the Anim Graph
Setup
Two steps: add the blink call to your Event Graph, then feed the values into a Control Rig node in the Anim Graph.
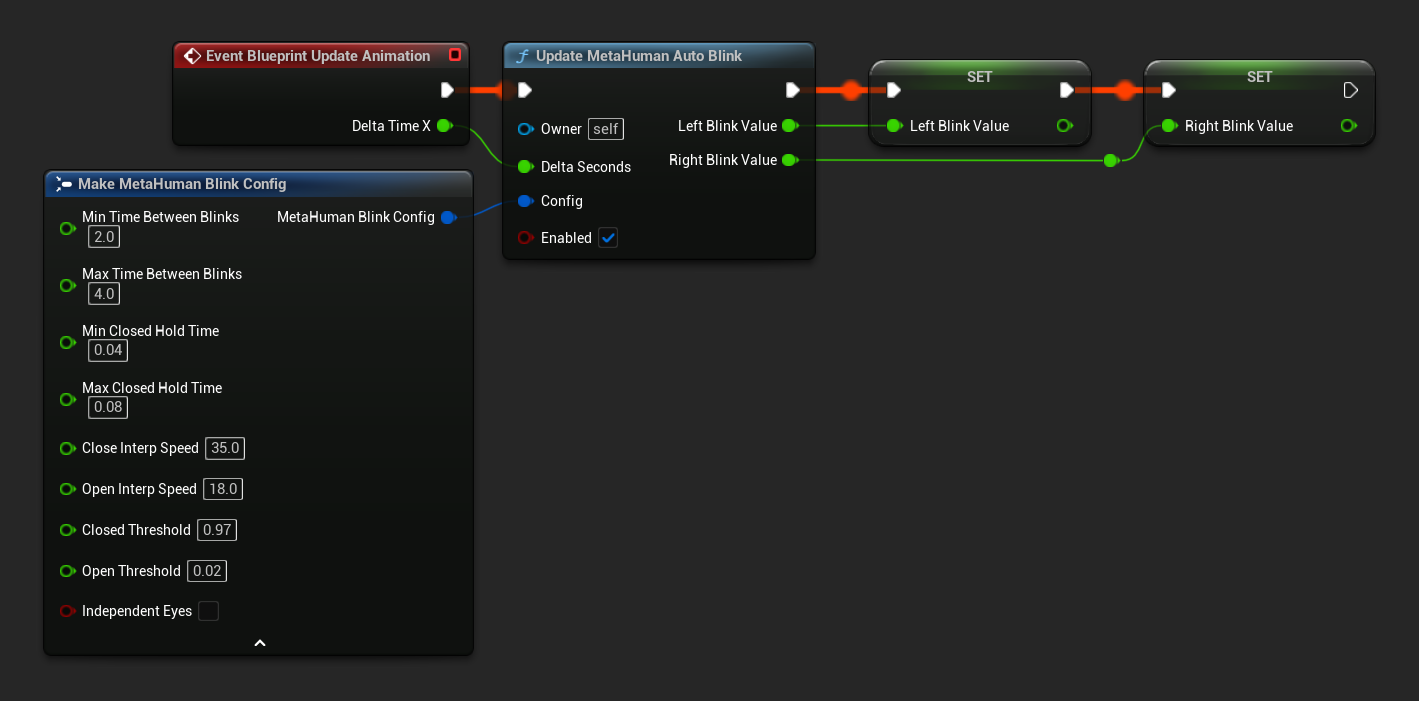
1. Event Graph: drive the blink values each frame
In your Face Animation Blueprint (e.g. Face_AnimBP or your duplicated/copied version, see Setup Guide), open the Event Graph and add the following to Event Blueprint Update Animation:
- Call
Update MetaHuman Auto Blink - Connect Delta Time X (from the event) to Delta Seconds
- (Optional) Configure the Config struct. The defaults already look natural
- Promote Left Blink Value and Right Blink Value to Blueprint variables (e.g.
LeftBlinkValue,RightBlinkValue)
2. Anim Graph: feed the values into the Face Control Rig
In the Anim Graph of the same Animation Blueprint:
- Place a Control Rig node after all other facial logic that might write to eye-blink curves (e.g. after
Blend Runtime MetaHuman Lip Syncand any custom facial animation layers) - In the node's Details panel, set Control Rig Class (Control Rig Asset Reference in UE 5.8+) to your MetaHuman face Control Rig. The path is typically:
/All/Game/MetaHumans/Common/Face/Face_ControlBoard_CtrlRig- Your project may have a different path depending on how the MetaHuman was imported.
- In the Details panel, expand the Input section and enable Use Pin for:
CTRL_L_eye_blinkCTRL_R_eye_blink
- Connect your
LeftBlinkValuevariable toCTRL_L_eye_blink - Connect your
RightBlinkValuevariable toCTRL_R_eye_blink

Place the Control Rig node after the lip sync blend nodes (and any other facial animation nodes) so the blink values aren't overwritten by other logic.
Configuration
The Update MetaHuman Auto Blink node accepts an optional Config struct. The defaults already look natural for most characters, expand below if you want to tune the behavior.
Config properties
Timing
| Property | Default | Description |
|---|---|---|
| Min Time Between Blinks | 2.0 s | Minimum interval between blinks while eyes are fully open. |
| Max Time Between Blinks | 4.0 s | Maximum interval between blinks. The actual interval is randomized between min and max. |
| Min Closed Hold Time | 0.04 s | Minimum time the eyes stay fully closed. |
| Max Closed Hold Time | 0.08 s | Maximum time the eyes stay fully closed. |
Interpolation
| Property | Default | Description |
|---|---|---|
| Close Interp Speed | 35.0 | Speed when closing the eyes. Humans close their eyes faster than they open them, so this is intentionally higher than the open speed. |
| Open Interp Speed | 18.0 | Speed when opening the eyes. |
| Closed Threshold | 0.97 | Value at which the blink is considered "fully closed" and the hold phase begins. |
| Open Threshold | 0.02 | Value at which the blink is considered "fully open" and the next blink is scheduled. |
Misc
| Property | Default | Description |
|---|---|---|
| Independent Eyes | false | When true, the left and right eye blink independently with separate timing. When false (default), both eyes blink in perfect sync. |
bEnabled (function pin) | true | When false, the eyes ease back open and blinking pauses. Useful for cutscenes, sleep, death, etc. |
Runtime Control
You can also call Reset Auto Blink State to explicitly clear the internal state for a given AnimInstance (e.g. when respawning a character or switching cinematic states).
Eyes Aim
The Eyes Aim helper is an Animation Blueprint node (Runtime MetaHuman Eyes Aim) that makes the character's eyes track a world-space location, for example, the player camera, another actor, or any moving target. It supports yaw/pitch clamping, smoothing, anti-flip protection when the target passes behind the head, and optional micro-saccades for added realism.
Choosing a Mode
The node supports two modes, selected via the Mode dropdown in the node's Details panel:
| Mode | What it drives | Where to place it |
|---|---|---|
| Curves (default) | The face Control Rig eye-look curves (CTRL_expressions_eyeLook*) | In the Face Animation Blueprint (e.g. Face_AnimBP), before the Control Rig node |
| Bones | The FACIAL_L_Eye / FACIAL_R_Eye bones directly, bypassing the Control Rig | In the Face Post Process Animation Blueprint (e.g. Face_PostProcess_AnimBP), after the AnimNode_RigLogic node |
Curves mode is the recommended default. It composes cleanly with other curve-based facial systems (lip sync, expressions, ARKit blendshapes, etc.), since values are combined through normal Control Rig evaluation rather than fighting over bone transforms.
On some MetaHuman variants (notably older rigs, including some downloaded via Quixel Bridge), the eye-look curves don't actually drive the eyes. The visible symptom is that the eyes look downward with the pupils almost hidden when the Curves-mode node is active, regardless of the target location.
If you see this, switch to Bones mode. Bones mode directly rotates the eye bones, so it works on every MetaHuman variant regardless of how the Control Rig is wired. See the Bones tab in Setup below.
Setup
- Curves Mode (default)
- Bones Mode (fallback)
The default setup. The node lives in the standard Face Animation Blueprint and drives the face Control Rig eye-look curves.
Two steps: add the node to your Anim Graph, then feed it a target location from the Event Graph.
1. Anim Graph: add the node
In your Face Animation Blueprint's Anim Graph:
- Add a
Runtime MetaHuman Eyes Aimnode - Leave Mode set to Curves in the Details panel
- Place it after all other facial logic that may write to eye-look curves (lip sync, custom animations, etc.), same principle as the Auto Blink Control Rig node
- Connect the existing pose to Source Pose
- Connect the output to the next node in your chain (or
Output Pose) - Create a
VectorBlueprint variable (e.g.TargetWorldLocation) and connect it to the node's Target World Location pin. You'll update this variable from the Event Graph in the next step.
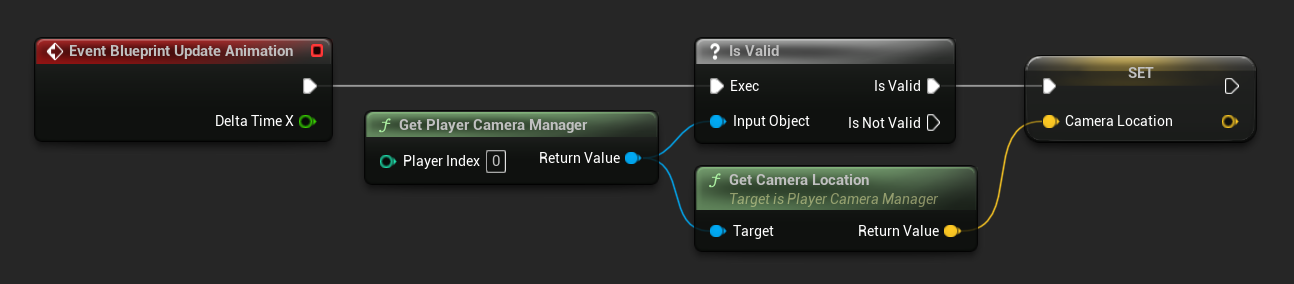
2. Event Graph: feed in a target location
The Target World Location pin expects a world-space FVector. A common case is having the MetaHuman look at the player camera. In Event Blueprint Update Animation:
- Get Player Camera Manager (Player Index 0)
- Check Is Valid
- If valid, call Get Camera Location
- Store it in the
TargetWorldLocationBlueprint variable
To track an arbitrary actor (NPC, item, point of interest) instead, get that actor's location each frame and store it in the same variable. For a fixed gaze point, set Target World Location once or as a constant in the node's Details panel.
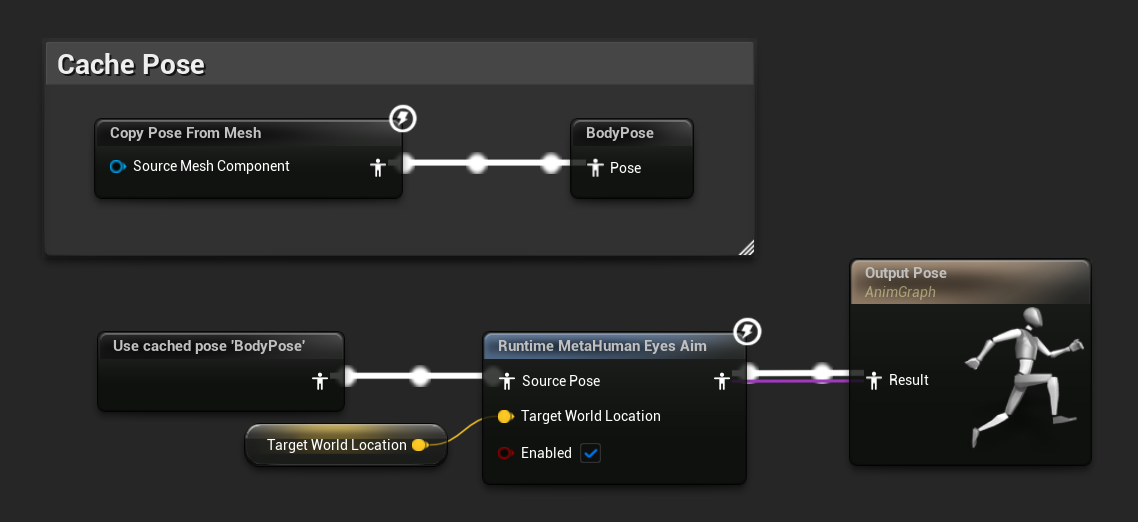
Use this setup if the Curves-mode approach doesn't work for your MetaHuman variant (see the warning above). In Bones mode, the node directly rotates the eye bones and must run after the Control Rig has finished evaluating, which means it belongs in the Face Post Process Animation Blueprint rather than the regular Face AnimBP.
Three steps: locate the Post Process Anim BP, add the node after RigLogic, then feed it a target location from that blueprint's Event Graph.
1. Locate the Face Post Process Anim BP
- Open your MetaHuman's face Skeletal Mesh asset (e.g.
Faceunder your MetaHuman's folder) - In the asset's Details panel, find the Post Process Anim Blueprint field
- Open that asset, it's typically named something like
Face_PostProcess_AnimBP
2. Anim Graph: add the node after RigLogic
In the Anim Graph of the Face Post Process Anim BP:
- Locate the existing
AnimNode_RigLogicnode (it converts the face Control Rig curves into bone transforms) - Add a
Runtime MetaHuman Eyes Aimnode afterAnimNode_RigLogicand beforeOutput Pose - In the node's Details panel, set Mode to Bones
- Connect
AnimNode_RigLogicto the Source Pose of the Eyes Aim node - Connect the Eyes Aim node's output to
Output Pose - Create a
VectorBlueprint variable (e.g.TargetWorldLocation) in this Post Process Anim BP and connect it to the node's Target World Location pin
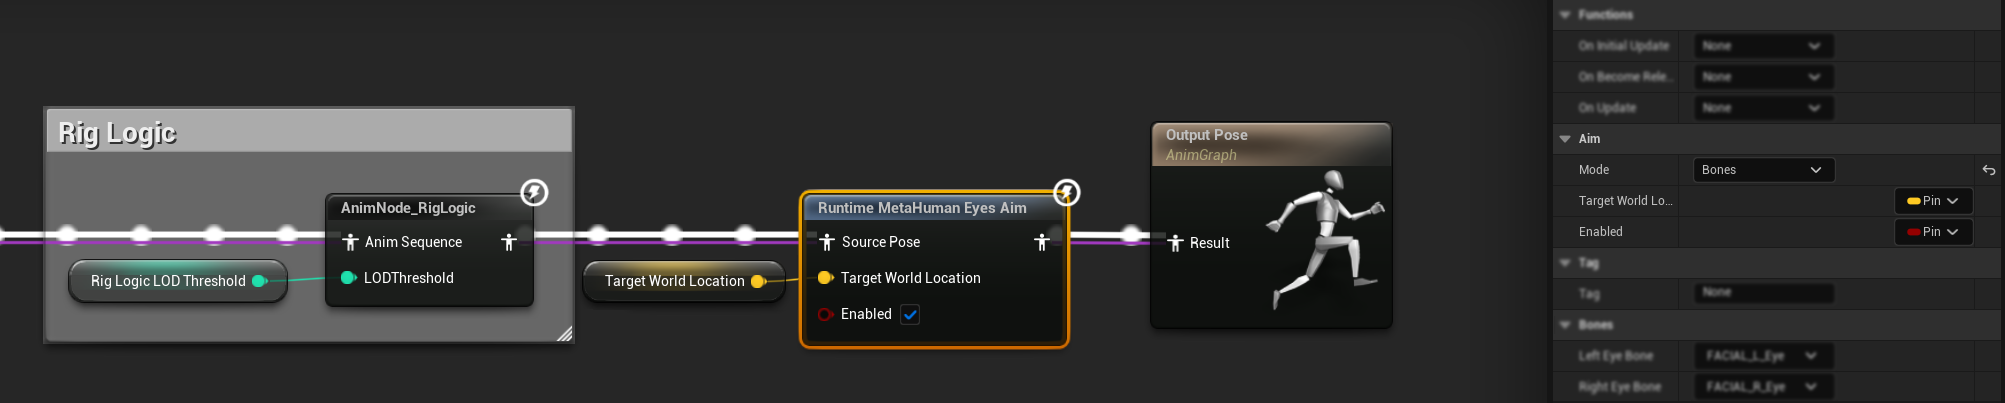
The default bone references (FACIAL_L_Eye and FACIAL_R_Eye) match the standard MetaHuman face skeleton. If your character uses a customized skeleton with different eye-bone names, override them in the node's Details panel under the Bones category.
3. Event Graph: feed in a target location
Because the node lives in the Post Process Anim BP, the target location logic must also live in this blueprint's Event Graph, not in Face_AnimBP. The setup is identical to Curves mode (get the camera location, an actor's location, or use a constant), just performed inside Face_PostProcess_AnimBP.
Any unrelated logic (lip sync, auto blink, etc.) can stay in the regular Face AnimBP. Only the target-location calculation for Eyes Aim needs to move here. The Face Control Rig forcibly drives the eye bones every frame based on its curves. If the Eyes Aim node ran in the regular Face AnimBP (before the Control Rig), the Control Rig would overwrite the bone rotations afterward. The Post Process Anim BP runs after the Control Rig has produced its final bone transforms, so it's the correct place to apply final bone rotations that need to "win".Why does Bones mode need the Post Process Anim BP?
Configuration
All settings are exposed on the Runtime MetaHuman Eyes Aim node's Details panel.
Aim & Clamp
Aim
| Property | Default | Description |
|---|---|---|
| Mode | Curves | Selects how the eyes are driven. See Choosing a Mode. |
| Target World Location | (0,0,0) | World-space point the eyes look at. Exposed as a pin by default. |
bEnabled | true | When false, the eyes ease back to forward and ignore the target. Exposed as a pin by default. |
Clamp
| Property | Default | Description |
|---|---|---|
| Max Yaw Degrees | 35° | Maximum horizontal (yaw) deflection from the head's forward direction. Clamped 0 to 80. |
| Max Pitch Degrees | 25° | Maximum vertical (pitch) deflection from the head's forward direction. Clamped 0 to 80. |
| Anti Flip Behind | true | Prevents the eyes from flipping when the target passes behind the head. |
Smoothing & Saccades
Smoothing
| Property | Default | Description |
|---|---|---|
| Interp Speed | 12.0 | Smoothing speed for eye motion. Higher = snappier, lower = more languid. |
Saccades
Micro-saccades are tiny, randomized gaze shifts that real eyes constantly perform. Adding them avoids the "dead-eye" look of perfectly smooth tracking.
| Property | Default | Description |
|---|---|---|
| Enable Saccades | true | Toggles micro-saccades on/off. |
| Saccade Yaw Amplitude Deg | 1.5° | Max horizontal jitter per saccade. Small values (1–2°) feel natural; larger values look twitchy. |
| Saccade Pitch Amplitude Deg | 1.0° | Max vertical jitter per saccade. Usually slightly smaller than the yaw amplitude. |
| Min Saccade Interval | 0.6 s | Minimum time between saccades. |
| Max Saccade Interval | 2.5 s | Maximum time between saccades. Larger values feel calmer, smaller values feel restless. |
Bones (Bones mode only)
| Property | Default | Description |
|---|---|---|
| Left Eye Bone | FACIAL_L_Eye | Left eye bone name. Matches the standard MetaHuman face skeleton. |
| Right Eye Bone | FACIAL_R_Eye | Right eye bone name. Matches the standard MetaHuman face skeleton. |
Calibration (Curves mode only)
These values define how head-space angles map to the MetaHuman face CR's eye-look curve values. The defaults are tuned for the standard MetaHuman face CR and rarely need changing.
| Property | Default | Description |
|---|---|---|
| Yaw Degrees Per Unit Curve | 30° | Angle that maps to a curve value of 1.0 for yaw look curves. |
| Pitch Degrees Per Unit Curve | 25° | Angle that maps to a curve value of 1.0 for pitch look curves. |
Combining With Lip Sync and Other Animations
Both helpers are designed to coexist with the plugin's lip sync nodes and any custom facial animation you already have. The general rule: place the Eyes Aim and Control Rig (auto-blink) nodes after lip sync and any custom facial animation, so their values aren't overwritten downstream.
View Detailed Execution Flowchart (Curves vs. Bones Mode)
Depending on whether your MetaHuman rig uses the recommended Curves Mode or the fallback Bones Mode, the placement of your execution logic will change. Expand the chart below to see the exact execution order for both pipelines:
Auto Blink and lip sync still live in the regular Face AnimBP in both modes.
For details on layering with body animations, see Combining with Existing Animations.
Notes & Limitations
These helpers are MetaHuman-specific. They rely on the standard MetaHuman face Control Rig curve names (CTRL_L_eye_blink, CTRL_R_eye_blink, CTRL_expressions_eyeLook*) and the standard eye bones (FACIAL_L_Eye, FACIAL_R_Eye). They're not intended for custom non-MetaHuman characters.
Need Help?
For custom development requests, contact [email protected].