How to use the plugin with custom characters
This guide walks you through the process of setting up Runtime MetaHuman Lip Sync for non-MetaHuman characters. This process requires familiarity with animation concepts and rigging. If you need assistance implementing this for your specific character, you can reach out for professional support at [email protected].
Important note about lip sync models
Custom characters are only supported with the Standard (Faster) model.
The Realistic (Higher Quality) model is designed for MetaHuman and ARKit characters and cannot be used with other custom characters. Throughout this guide, you should follow the Standard model instructions from the main setup guide when referenced.
Extension Plugin Required: To use the Standard Model with custom characters, you must install the Standard Lip Sync Extension plugin as described in the Prerequisites section of the main setup guide.
This extension is required for all custom character implementations described in this guide.
Prerequisites
Before getting started, ensure your character meets these requirements:
- Has a valid skeleton
- Contains morph targets (blend shapes) for facial expressions
- Ideally has 10+ morph targets defining visemes (more visemes = better lip sync quality)
The plugin requires mapping your character's morph targets to the following standard visemes:
Sil -> Silence
PP -> Bilabial plosives (p, b, m)
FF -> Labiodental fricatives (f, v)
TH -> Dental fricatives (th)
DD -> Alveolar plosives (t, d)
KK -> Velar plosives (k, g)
CH -> Postalveolar affricates (ch, j)
SS -> Sibilants (s, z)
NN -> Nasal (n)
RR -> Approximant (r)
AA -> Open vowel (aa)
E -> Mid vowel (e)
IH -> Close front vowel (ih)
OH -> Close-mid back vowel (oh)
OU -> Close back vowel (ou)
Note: If your character has a different set of visemes (which is likely), you don't need exact matches for each viseme. Approximations are often sufficient - for example, mapping your character's SH viseme to the plugin's CH viseme would work effectively since they're closely related postalveolar sounds.
Viseme mapping reference
Here are mappings between common viseme systems and the plugin's required visemes:
- Apple ARKit
- FACS-Based Systems
- Preston Blair System
- 3ds Max Phoneme System
- Custom Characters (Daz Genesis 8/9, Reallusion CC3/CC4, Mixamo, ReadyPlayerMe)
ARKit provides a comprehensive set of blendshapes for facial animation, including several mouth shapes. Here's how to map them to the RuntimeMetaHumanLipSync visemes:
| RuntimeMetaHumanLipSync Viseme | ARKit Equivalent | Notes |
|---|---|---|
| Sil | mouthClose | The neutral/rest position |
| PP | mouthPressLeft + mouthPressRight | For bilabial sounds, use both press shapes together |
| FF | lowerLipBiteLeft + lowerLipBiteRight (or mouthRollLower) | Lower lip contacts upper teeth, as in "f" and "v" sounds |
| TH | tongueOut | ARKit has direct tongue control |
| DD | jawOpen (mild) + tongueUp (if you have tongue rig) | Tongue touches alveolar ridge; slight jaw drop |
| KK | mouthLeft or mouthRight (mild) | Subtle mouth corner pull approximates velar sounds |
| CH | jawOpen (mild) + mouthFunnel (mild) | Combine for postalveolar sounds |
| SS | mouthFrown | Use a slight frown for sibilants |
| NN | jawOpen (very mild) + mouthClose | Almost closed mouth with slight jaw opening |
| RR | mouthPucker (mild) | Subtle rounding for r-sounds |
| AA | jawOpen + mouthStretchLeft + mouthStretchRight (or jawOpen + mouthOpen) | Wide open mouth for "ah" sound |
| E | jawOpen (mild) + mouthSmile | Mid-open position with slight smile |
| IH | mouthSmile (mild) | Slight spreading of lips |
| OH | mouthFunnel | Rounded open shape |
| OU | mouthPucker | Tightly rounded lips |
FACS (Facial Action Coding System) uses Action Units (AUs) to describe facial movements. Many professional animation systems use FACS-based approaches:
| RuntimeMetaHumanLipSync Viseme | FACS Action Units | Notes |
|---|---|---|
| Sil | Neutral | No active AUs |
| PP | AU23 + AU24 | Lip presser + lip tightener |
| FF | AU22 + AU28 | Lip funneler + lip suck |
| TH | AU25 (mild) + AU27 | Lips apart + mouth stretch |
| DD | AU25 + AU16 | Lips apart + lower lip depressor |
| KK | AU26 + AU14 | Jaw drop + dimpler |
| CH | AU18 + AU25 | Lip pucker + lips apart |
| SS | AU20 | Lip stretcher |
| NN | AU25 (very mild) | Slight lips apart |
| RR | AU18 (mild) | Mild lip pucker |
| AA | AU27 + AU26 | Mouth stretch + jaw drop |
| E | AU25 + AU12 | Lips apart + lip corner puller |
| IH | AU12 + AU25 (mild) | Lip corner puller + mild lips apart |
| OH | AU27 (mild) + AU18 | Mild mouth stretch + lip pucker |
| OU | AU18 + AU26 (mild) | Lip pucker + mild jaw drop |
The Preston Blair system is a classic animation standard that uses descriptive names for mouth shapes:
| RuntimeMetaHumanLipSync Viseme | Preston Blair | Notes |
|---|---|---|
| Sil | Rest | Neutral closed mouth position |
| PP | MBP | The classic "MBP" mouth shape |
| FF | FV | The "FV" position with teeth on lower lip |
| TH | TH | Tongue touching front teeth |
| DD | D/T/N | Similar position for these consonants |
| KK | CKG | Hard consonant position |
| CH | CH/J/SH | Slight pout for these sounds |
| SS | S/Z | Slightly open teeth position |
| NN | N/NG/L | Similar to D/T but different tongue position |
| RR | R | Rounded lips for R sound |
| AA | AI | Wide open mouth |
| E | EH | Medium open mouth |
| IH | EE | Spread lips |
| OH | OH | Rounded medium opening |
| OU | OO | Tightly rounded lips |
3ds Max uses a phoneme-based system for its character studio:
| RuntimeMetaHumanLipSync Viseme | 3ds Max Phoneme | Notes |
|---|---|---|
| Sil | rest | Default mouth position |
| PP | p_b_m | Direct equivalent |
| FF | f_v | Direct equivalent |
| TH | th | Direct equivalent |
| DD | t_d | Direct equivalent |
| KK | k_g | Direct equivalent |
| CH | sh_zh_ch | Combined shape |
| SS | s_z | Direct equivalent |
| NN | n_l | Combined for these sounds |
| RR | r | Direct equivalent |
| AA | ah | Open vowel sound |
| E | eh | Mid vowel |
| IH | ee | Close front vowel |
| OH | oh | Back rounded vowel |
| OU | oo | Close back vowel |
Custom characters with viseme or mouth blend shapes/morph targets (Daz Genesis 8/9, Reallusion CC3/CC4, Mixamo, ReadyPlayerMe, etc) can typically be mapped to the plugin's viseme system with reasonable approximations.
Creating a custom Pose Asset
Follow these steps to create a custom pose asset for your character that will be used with the Blend Runtime MetaHuman Lip Sync node:
1. Locate your character's Skeletal Mesh
Find the skeletal mesh that contains the morph targets (blend shapes) you want to use for lip sync animation. This might be a full-body mesh or just a face mesh, depending on your character's design.
2. Verify Morph Targets and Curves
Before proceeding, check that your skeletal mesh has appropriate morph targets and corresponding curves for lip sync animation.
Check Morph Targets: Verify that your skeletal mesh contains morph targets (blend shapes) that can be used as visemes for lip sync animation. Most characters with facial animation support should have some phoneme/viseme morph targets.
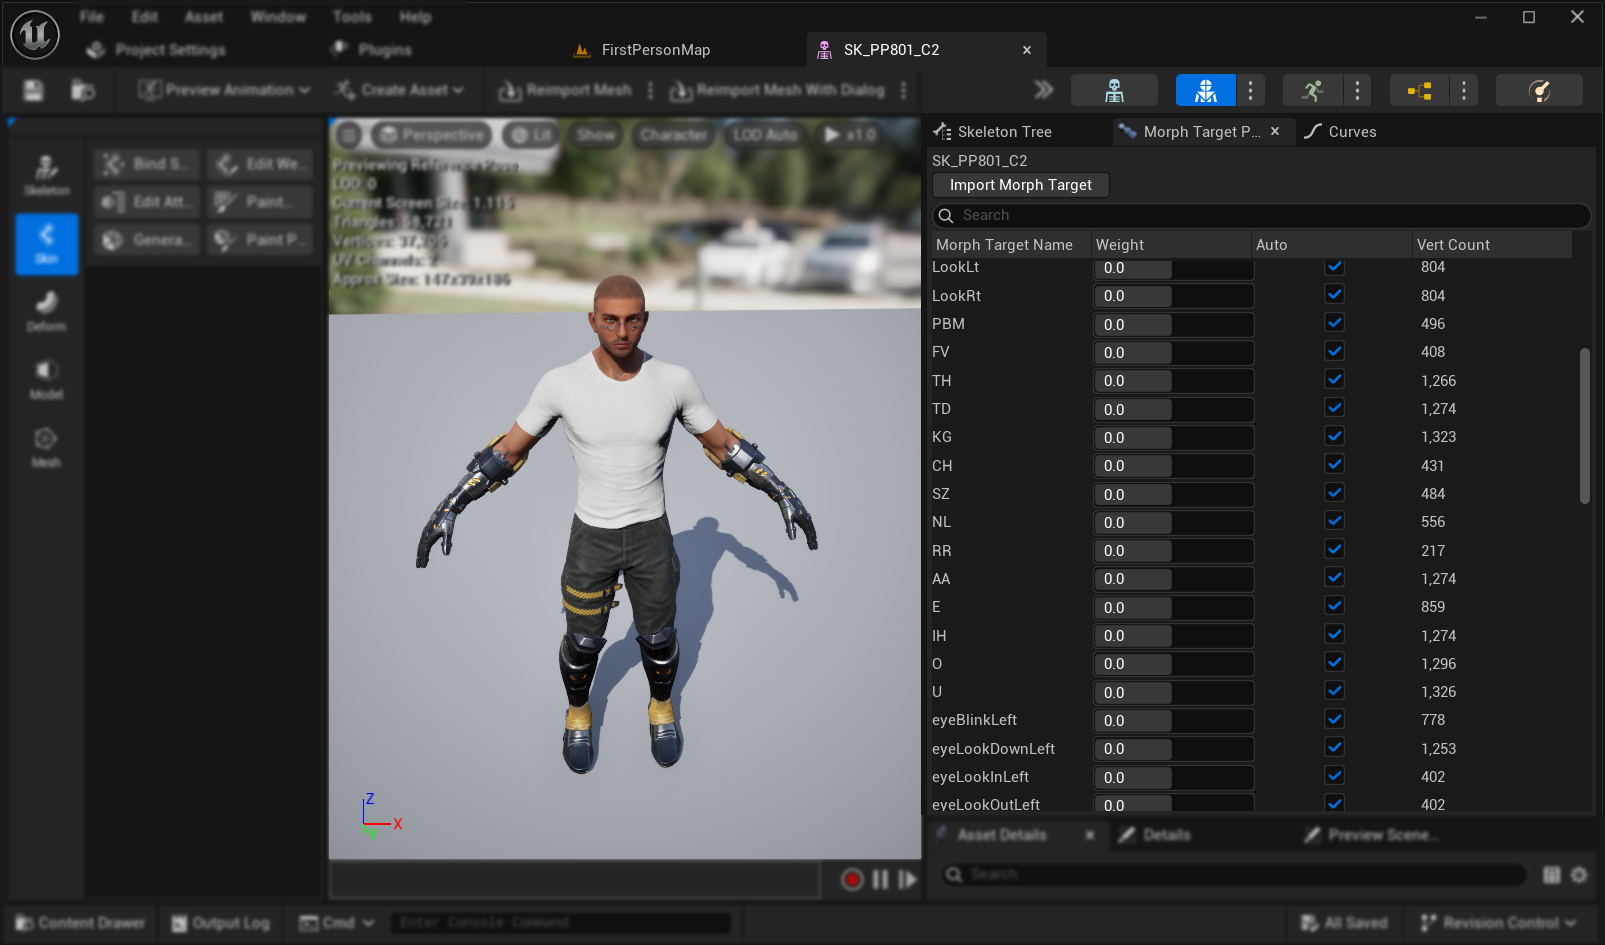
Important: Verify Curves Tab This step is especially crucial for characters exported from Blender or other external software:
- Open the Curves tab in the Skeletal Mesh editor
- Check if you can see curves corresponding to your morph targets
- If the Curves tab is empty but morph targets exist, manually add new curves using exactly the same names as your morph targets
Note: This issue commonly occurs with Blender exports where morph targets import successfully but animation curves aren't automatically created. Without matching curves, the animation won't populate properly after baking to Control Rig.
Alternative Solution: To prevent this issue during export from Blender, try enabling Custom Properties and Animation in your FBX export settings, which may help include animation curves alongside the morph targets.
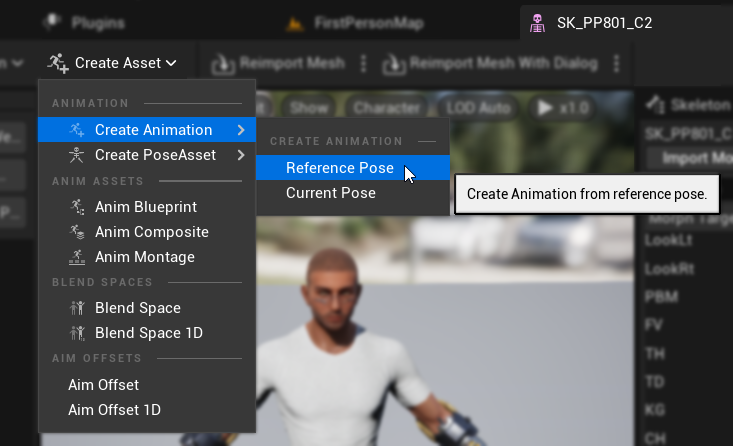
3. Create a Reference Pose Animation
- Go to
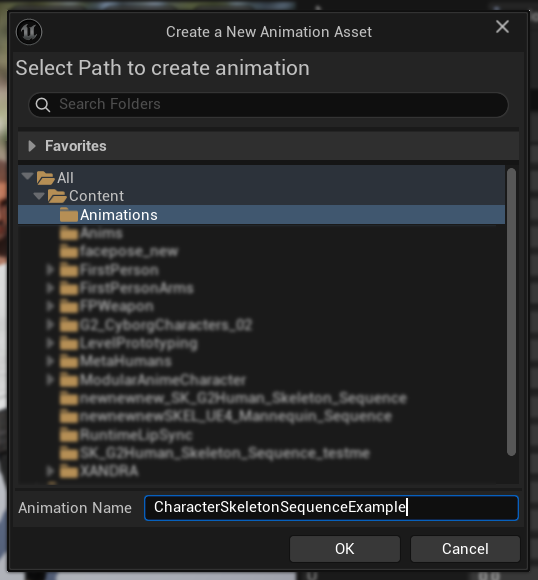
Create Asset -> Create Animation -> Reference Pose - Enter a descriptive name for the animation sequence and save it in an appropriate location
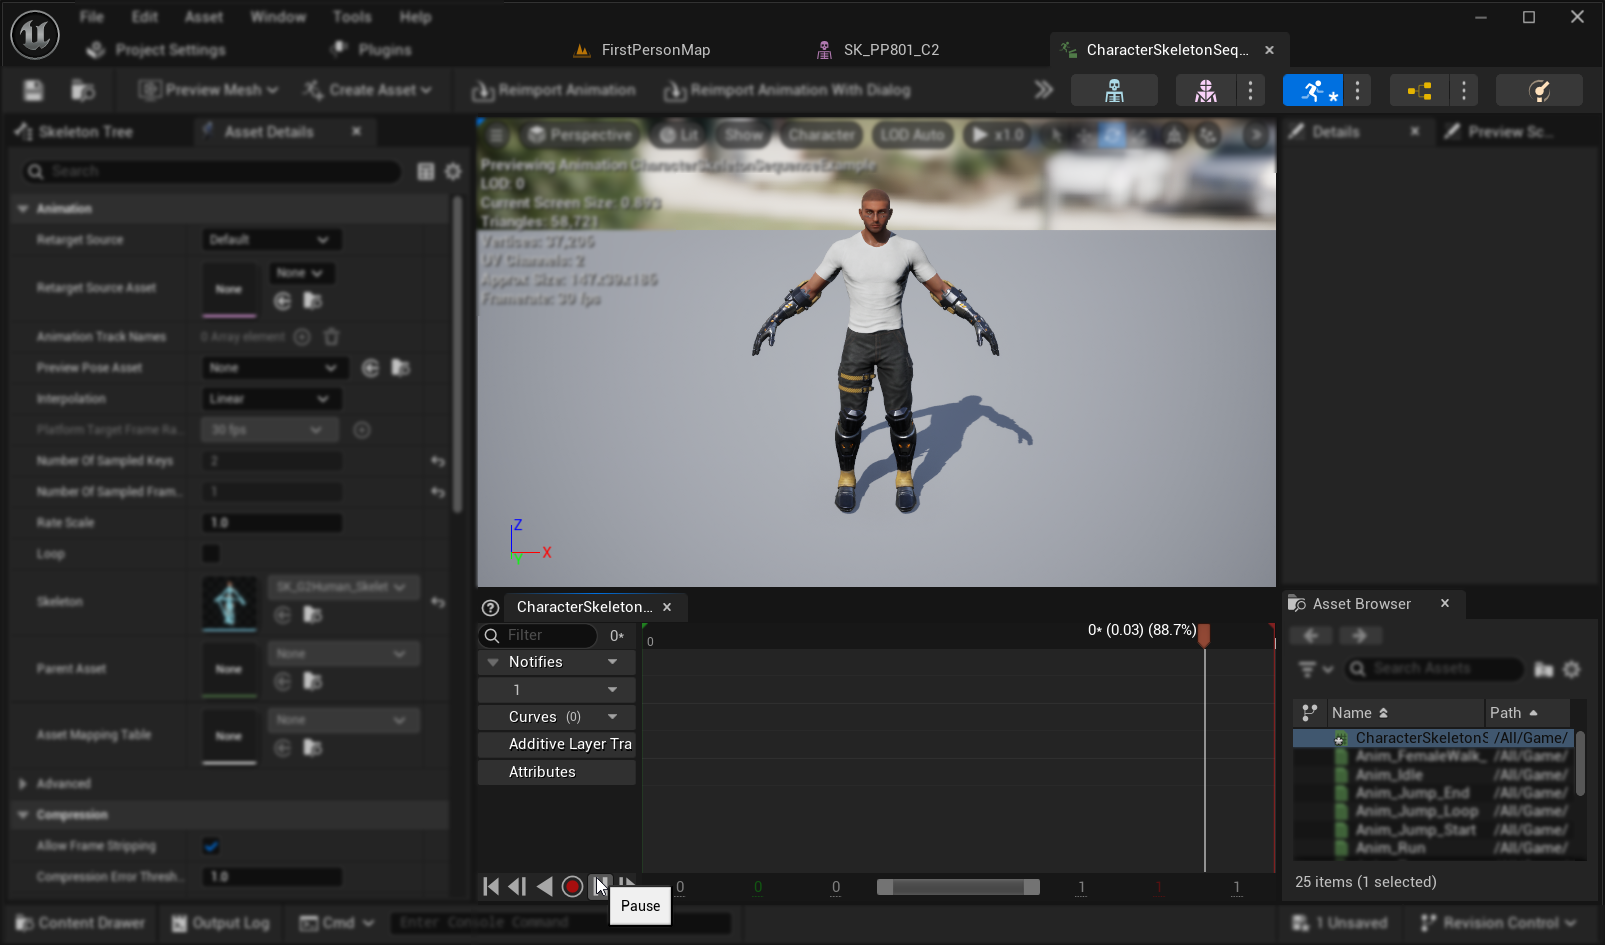
- The created Animation Sequence will open automatically, showing an empty animation playing in a loop
- Click the
Pausebutton to stop the animation playback for easier editing
4. Edit the Animation Sequence
- Click on
Edit in Sequencer->Edit with FK Control Rig - In the
Bake to Control Rigdialog, click theBake to Control Rigbutton without changing any settings
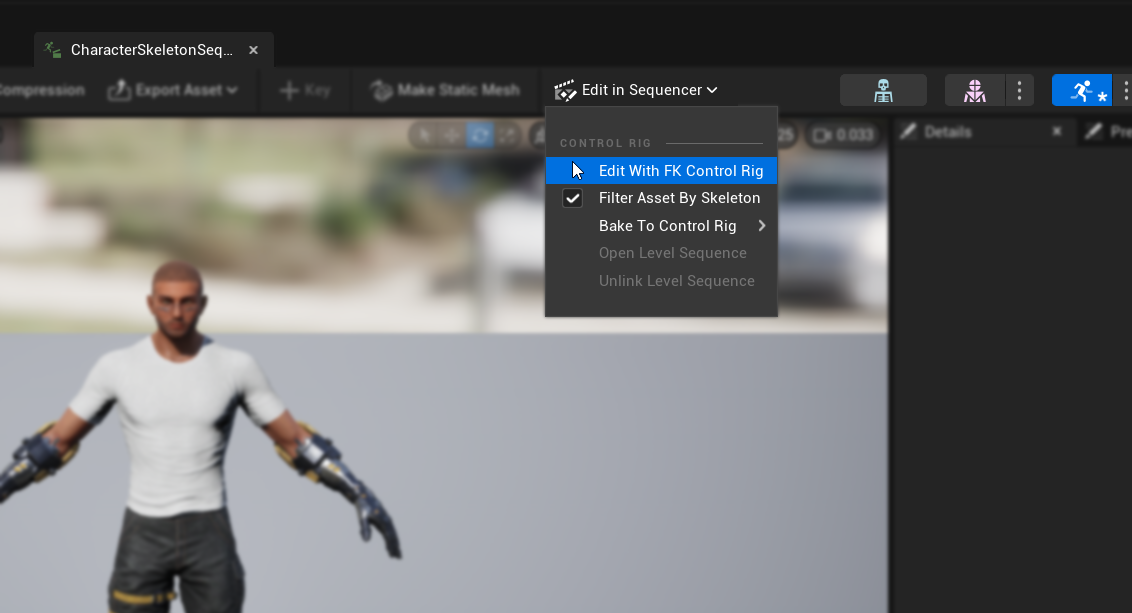
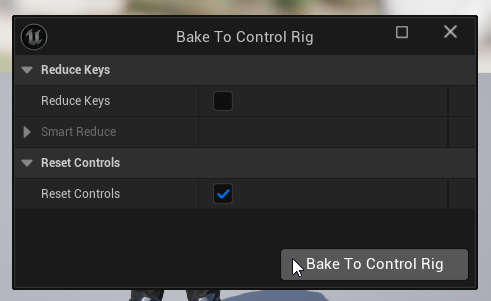
- The editor will switch to
Animation Modewith theSequencertab open - Set the
View Range End Timeto 0016 (which will automatically setWorking Range Endto 0016 as well) - Drag the slider's right edge to the right end of the sequencer window
5. Prepare the Animation Curves
- Return to the Animation Sequence asset and locate the morph targets in the
Curveslist (if they're not visible, close and reopen the Animation Sequence asset) - Remove any morph targets that aren't related to visemes or mouth movements you want to use for lip sync
6. Plan your viseme mapping
Create a mapping plan to match your character's visemes to the plugin's required set. For example:
Sil -> Sil
PP -> FV
FF -> FV
TH -> TH
DD -> TD
KK -> KG
CH -> CH
SS -> SZ
NN -> NL
RR -> RR
AA -> AA
E -> E
IH -> IH
OH -> O
OU -> U
Note that it's acceptable to have repeated mappings when your character's viseme set doesn't have exact matches for every required viseme.
7. Animate each viseme
- For each viseme, animate the relevant morph target curves from 0.0 to 1.0
- Start each viseme animation on a different frame
- Configure additional curves as needed (jaw/mouth opening, tongue position, etc.) to create natural-looking viseme shapes
8. Create a Pose Asset
- Go to
Create Asset->Pose Asset->Current Animation - Enter a descriptive name for the Pose Asset and save it in an appropriate location
- The created Pose Asset will open automatically, showing poses like
Pose_0,Pose_1, etc., each corresponding to a viseme - Preview the viseme weights to ensure they work as expected
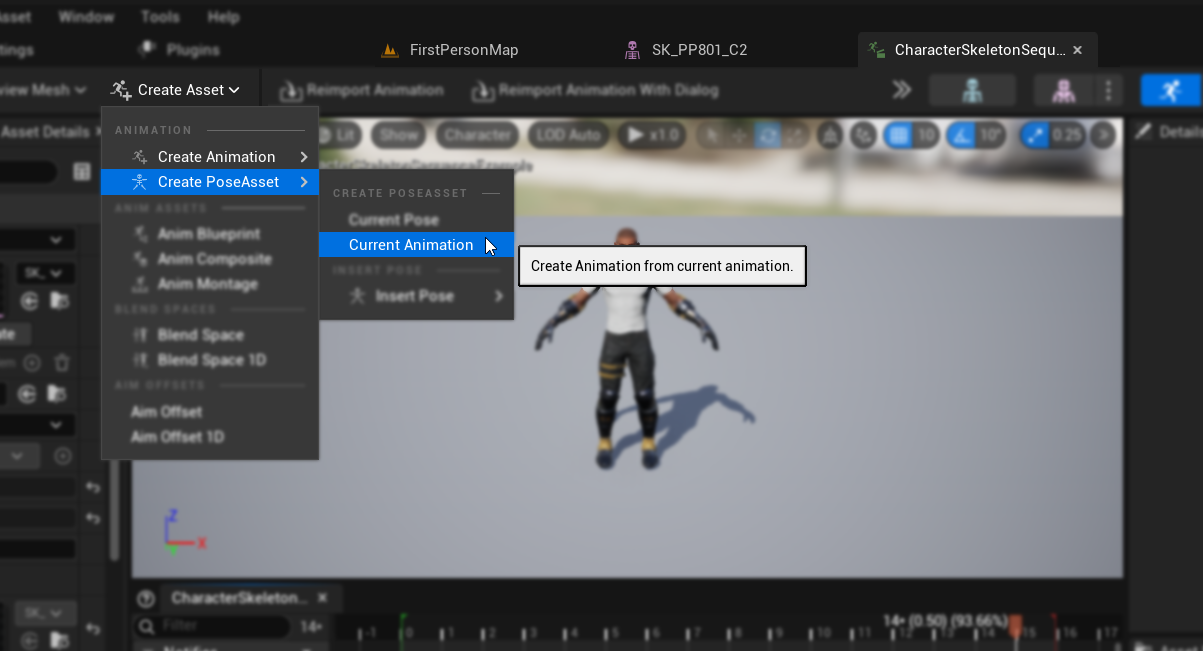
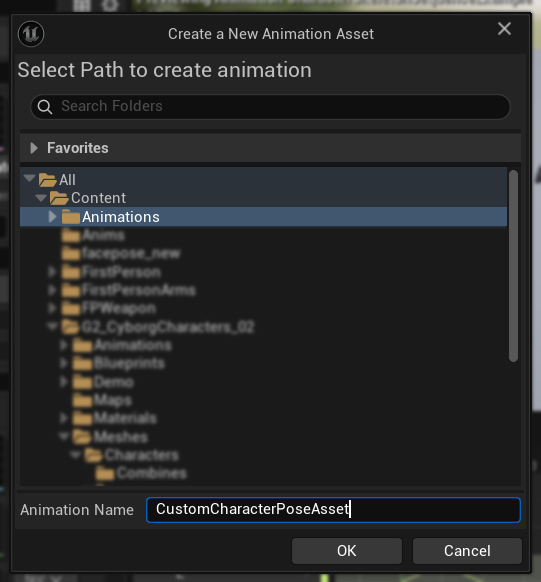
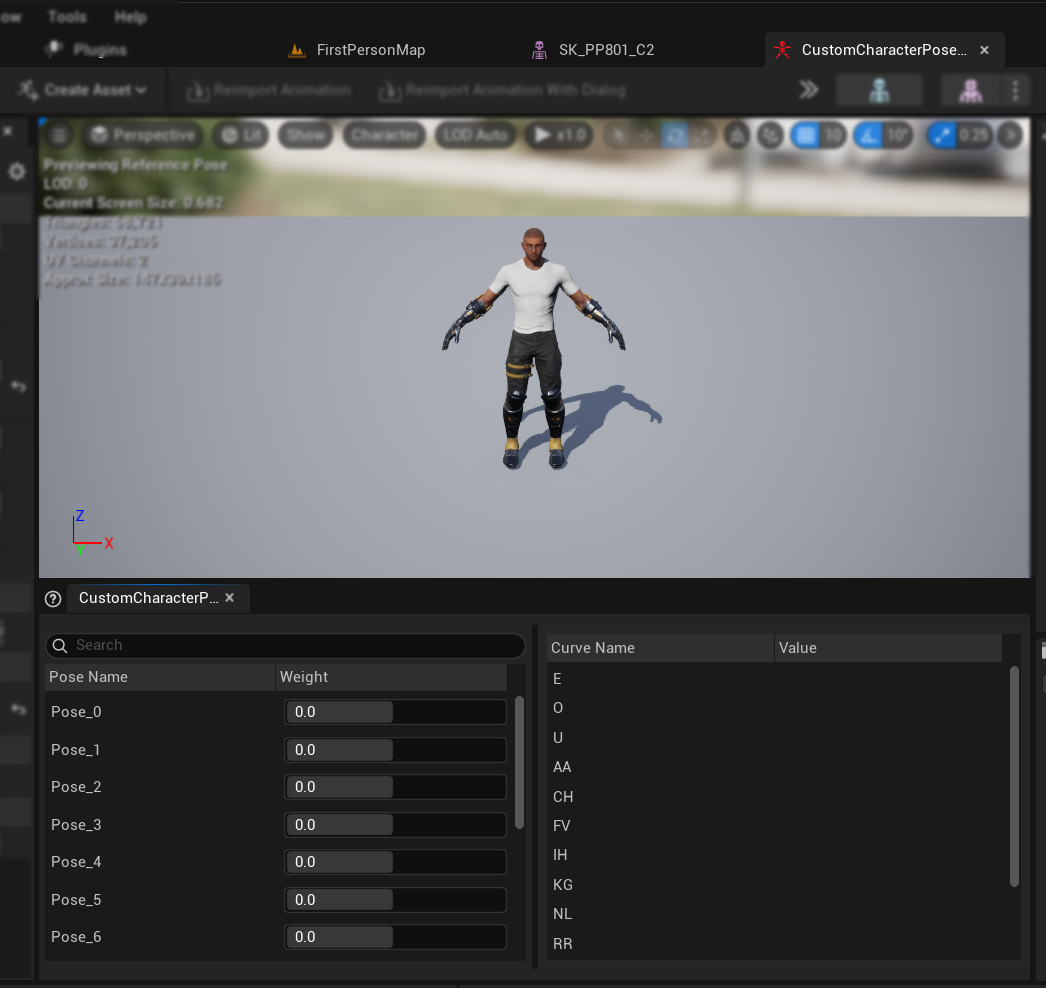
9. Finalize the Pose Asset
- Rename each pose to match the viseme names from the Prerequisites section
- Delete any unused poses
Setting up audio handling and blending
Once your pose asset is ready, you need to set up the audio handling and blending nodes:
- Locate or create your character's Animation Blueprint
- Set up the audio handling and blending following the same steps as documented in the standard plugin setup guide
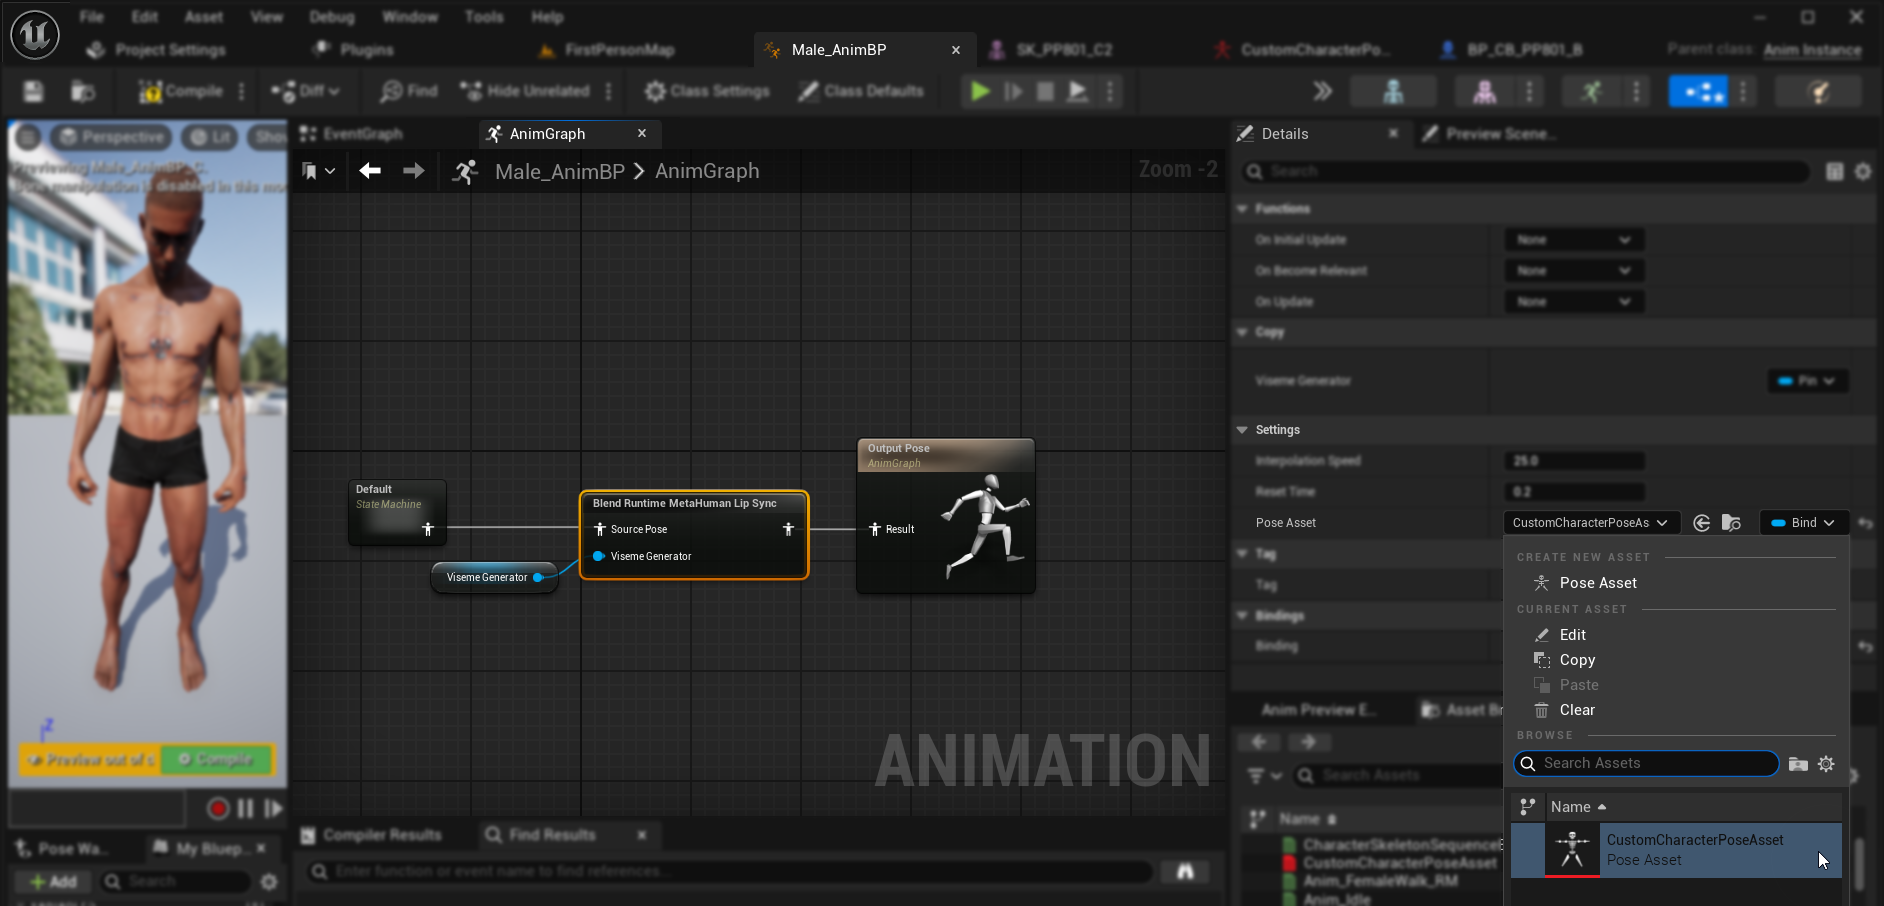
- In the
Blend Runtime MetaHuman Lip Syncnode, select your custom Pose Asset instead of the default MetaHuman pose asset
Combining with body animations
If you want to perform lip sync alongside other body animations:
- Follow the same steps as documented in the standard plugin guide
- Make sure to provide the correct bone names for your character's neck skeleton instead of using the MetaHuman bone names
Results
Here are examples of custom characters using this setup:
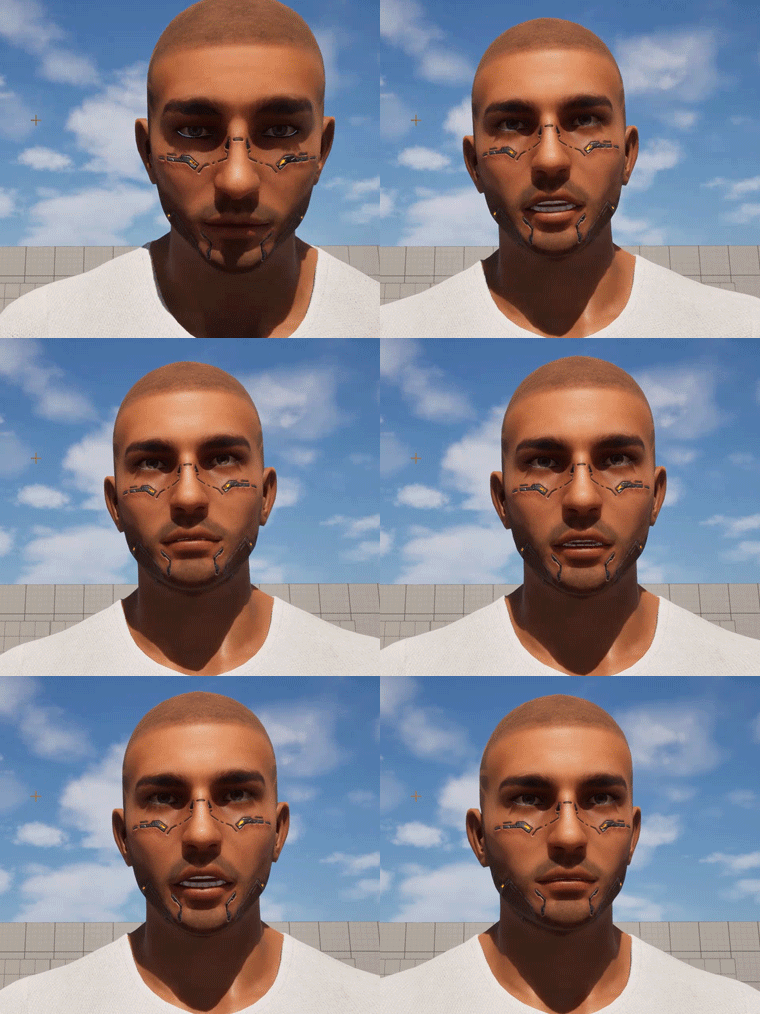


The quality of lip sync largely depends on the specific character and how well its visemes are set up. The examples above demonstrate the plugin working with different types of custom characters with distinct viseme systems.