Setup Guide
This guide walks you through the basic setup process for Runtime MetaHuman Lip Sync with your MetaHuman characters.
Note: Runtime MetaHuman Lip Sync works with both MetaHuman and custom characters. For detailed instructions on setting up custom characters, see the Custom Character Setup Guide.
Prerequisites
Before getting started, ensure:
-
MetaHuman Plugin Requirements:
- UE 5.5 and Earlier: Enable the MetaHuman plugin in your project
- UE 5.6 and Later: Enable the MetaHuman Core Tech plugin in your project
Additional MetaHuman PluginsDepending on how you create your MetaHuman characters, you may need additional plugins. For example, if you intend to create a MetaHuman with the new MetaHuman Creator system introduced in UE 5.6, you'll also need to enable the MetaHuman Creator plugin. For more information about this system, see the MetaHuman Creator documentation.
-
You have at least one MetaHuman character downloaded and available in your project
-
The Runtime MetaHuman Lip Sync plugin is installed
Standard Model Extension Plugin
If you plan to use the Standard Model, you'll need to install the extension plugin:
- Download the Standard Lip Sync Extension plugin from here
- Extract the folder from the downloaded archive into the
Pluginsfolder of your project (create this folder if it doesn't exist) - Ensure your project is set up as a C++ project (even if you don't have any C++ code)
- Rebuild your project
- This extension is only required if you want to use the Standard Model. If you only need the Realistic Models, you can skip this step.
- For more information on how to build plugins manually, see the Building Plugins tutorial
Additional Plugins
- If you plan to use audio capture (e.g., microphone input), install the Runtime Audio Importer plugin.
- If you plan to use text-to-speech functionality:
- For local TTS (Standard Model and Mood-Enabled Realistic Model), install the Runtime Text To Speech plugin.
- For external TTS providers (ElevenLabs, OpenAI, Google Cloud, Azure), install the Runtime AI Chatbot Integrator plugin.
Animation Blueprint Setup
Step 1: Locate and modify the face animation Blueprint
- UE 5.5 and Earlier (or Legacy MetaHumans in UE 5.6+)
- UE 5.6+ MetaHuman Creator Characters
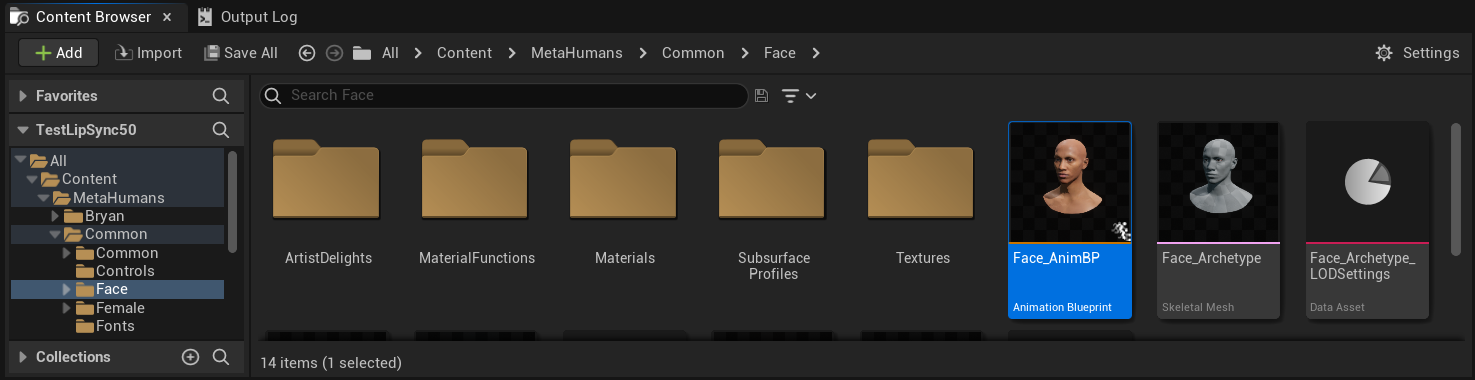
You need to modify an Animation Blueprint that will be used for your MetaHuman character's facial animations. The default MetaHuman face Animation Blueprint is located at:
Content/MetaHumans/Common/Face/Face_AnimBP
You have several options for implementing the lip sync functionality:
- Edit Default Asset (Simplest Option)
- Create Duplicate
- Use Custom Animation Blueprint
Open the default Face_AnimBP directly and make your modifications. Any changes will affect all MetaHuman characters using this Animation Blueprint.
Note: This approach is convenient but will impact all characters using the default Animation Blueprint.
- Duplicate
Face_AnimBPand give it a descriptive name - Locate your character's Blueprint class (e.g., for character "Bryan", it would be at
Content/MetaHumans/Bryan/BP_Bryan) - Open the character Blueprint and find the Face component
- Change the Anim Class property to your newly duplicated Animation Blueprint
Note: This approach allows you to customize lip sync for specific characters while leaving others unchanged.
You can implement the lip sync blending in any Animation Blueprint that has access to the required facial bones:
- Create or use an existing custom Animation Blueprint
- Ensure your Animation Blueprint works with a skeleton that contains the same facial bones as the default MetaHuman's
Face_Archetype_Skeleton
Note: This approach gives you maximum flexibility for integration with custom animation systems.
Starting with UE 5.6, the new MetaHuman Creator system was introduced. For these characters, the plugin provides a face Animation Blueprint located at:
Content/LipSyncData/LipSync_Face_AnimBP
This Animation Blueprint is located in the plugin's content folder and will be overwritten with each plugin update. To prevent losing your customizations:
- Copy this asset to your project's Content folder (for example, to
YourProject/Content/MetaHumans/LipSync_Face_AnimBP) - Use your copied version in your character setup
- Make all your modifications to the copied version
Using the Plugin's Face Animation Blueprint:
- Locate your MetaHuman Creator character's Blueprint class
- Open the character Blueprint and find the Face component
- Change the Anim Class property to the plugin's
LipSync_Face_AnimBP - Continue with the next steps to configure the Runtime MetaHuman Lip Sync functionality
Step 2: Event Graph setup
Open your Face Animation Blueprint and switch to the Event Graph. You'll need to create a generator that will process audio data and generate lip sync animation.
- Standard Model
- Realistic Model
- Mood-Enabled Realistic Model
- Add the
Event Blueprint Begin Playnode if it doesn't exist already - Add the
Create Runtime Viseme Generatornode and connect it to the Begin Play event - Save the output as a variable (e.g. "VisemeGenerator") for use in other parts of the graph

For detailed configuration options, see the Standard Model Configuration section.
- Add the
Event Blueprint Begin Playnode if it doesn't exist already - Add the
Create Realistic MetaHuman Lip Sync Generatornode and connect it to the Begin Play event - Save the output as a variable (e.g. "RealisticMetaHumanLipSyncGenerator") for use in other parts of the graph
- (Optional) Configure the generator settings using the Configuration parameter
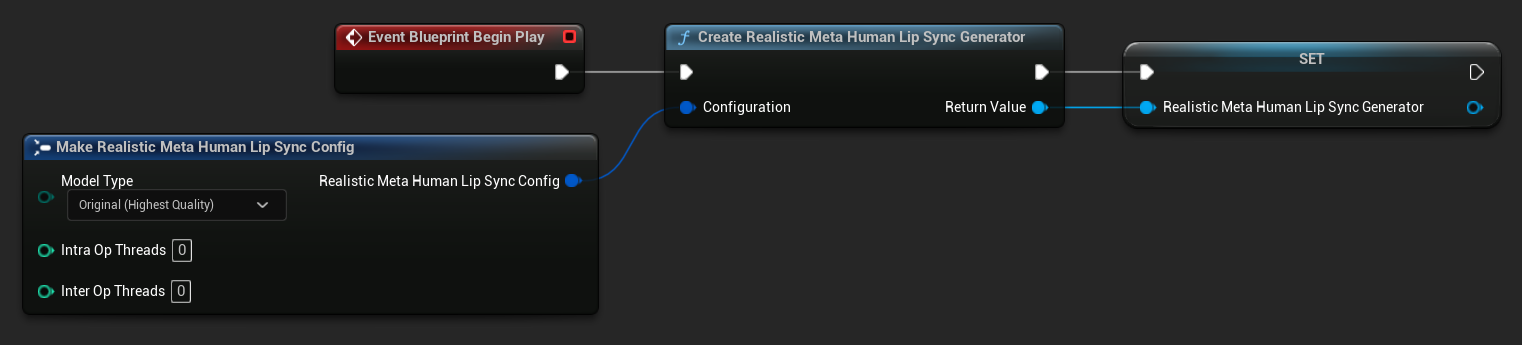
For detailed configuration options including model types, performance settings, and processing parameters, see the Realistic Model Configuration section.
- Add the
Event Blueprint Begin Playnode if it doesn't exist already - Add the
Create Realistic MetaHuman Lip Sync With Mood Generatornode and connect it to the Begin Play event - Save the output as a variable (e.g. "MoodMetaHumanLipSyncGenerator") for use in other parts of the graph
- (Optional) Configure the generator settings using the Configuration parameter
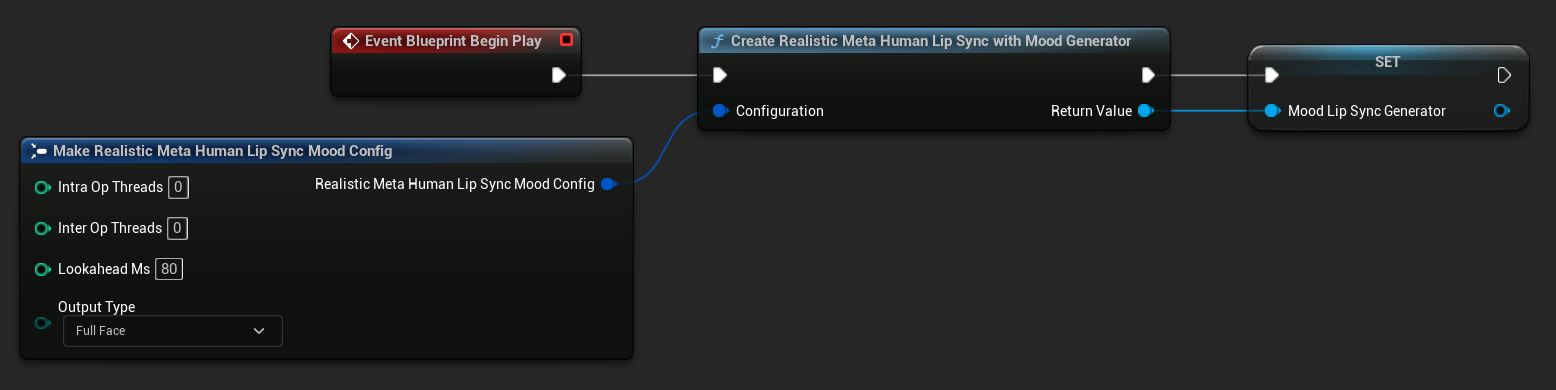
For detailed mood configuration including mood types, intensity settings, lookahead timing, and output type selection, see the Mood-Enabled Model Configuration section.
Step 3: Anim Graph setup
After setting up the Event Graph, switch to the Anim Graph to connect the generator to the character's animation:
- Standard Model
- Realistic Model
- Mood-Enabled Realistic Model
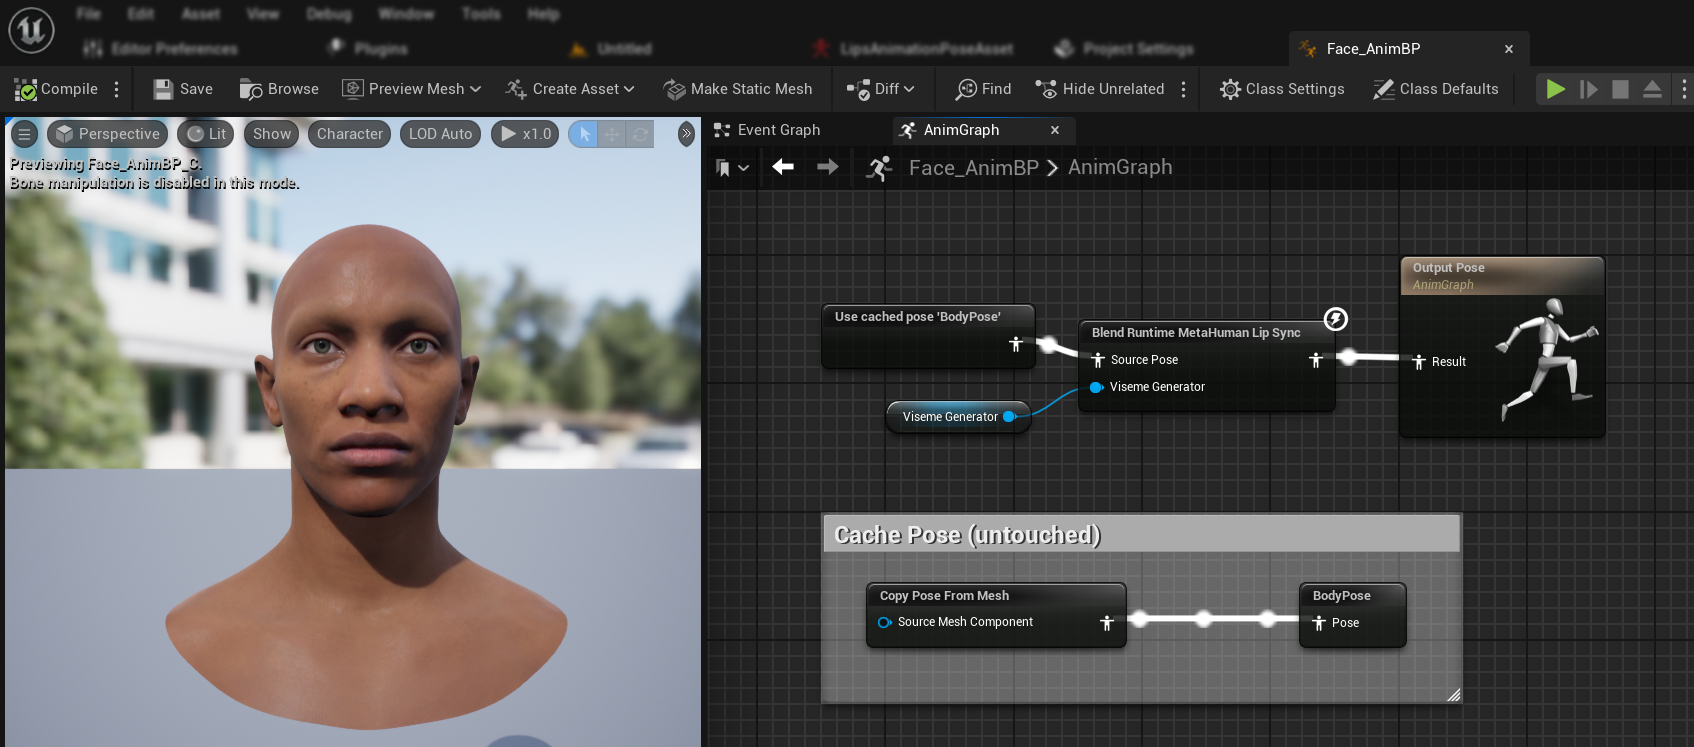
- Locate the pose that contains the MetaHuman face (typically from
Use cached pose 'Body Pose') - Add the
Blend Runtime MetaHuman Lip Syncnode - Connect the pose to the
Source Poseof theBlend Runtime MetaHuman Lip Syncnode - Connect your
VisemeGeneratorvariable to theViseme Generatorpin - Connect the output of the
Blend Runtime MetaHuman Lip Syncnode to theResultpin of theOutput Pose
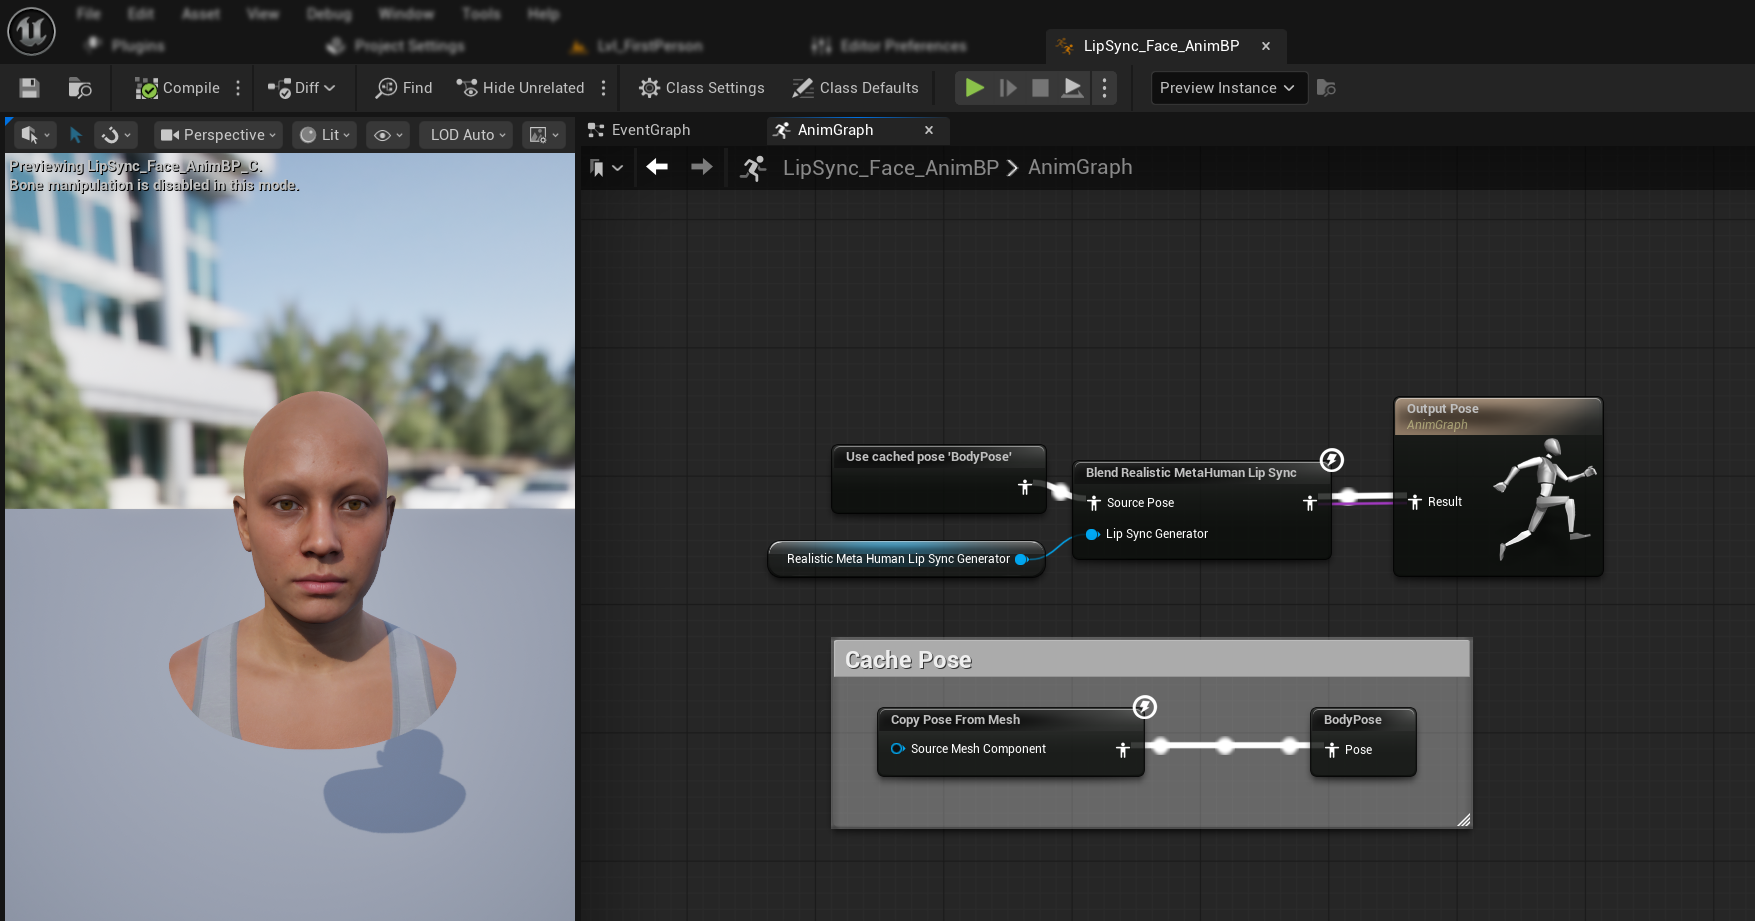
- Locate the pose that contains the MetaHuman face (typically from
Use cached pose 'Body Pose') - Add the
Blend Realistic MetaHuman Lip Syncnode - Connect the pose to the
Source Poseof theBlend Realistic MetaHuman Lip Syncnode - Connect your
RealisticMetaHumanLipSyncGeneratorvariable to theLip Sync Generatorpin - Connect the output of the
Blend Realistic MetaHuman Lip Syncnode to theResultpin of theOutput Pose
- Locate the pose that contains the MetaHuman face (typically from
Use cached pose 'Body Pose') - Add the
Blend Realistic MetaHuman Lip Syncnode (same node as regular realistic model) - Connect the pose to the
Source Poseof theBlend Realistic MetaHuman Lip Syncnode - Connect your
MoodMetaHumanLipSyncGeneratorvariable to theLip Sync Generatorpin - Connect the output of the
Blend Realistic MetaHuman Lip Syncnode to theResultpin of theOutput Pose

Note: The mood-enabled model uses the same Animation Blueprint node as the regular realistic model. The mood functionality is handled internally by the generator.
Next Steps
Now that you have the basic Animation Blueprint setup complete, you'll need to configure audio input processing to feed audio data to your lip sync generator.
Continue to the Audio Processing Guide to learn how to set up different audio input methods including microphone capture, text-to-speech, and audio file processing.
For advanced configuration options and fine-tuning, see the Configuration Guide.